Difference: PrimerDesignBenchling (1 vs. 15)
Revision 152025-10-22 - IsaacGifford
Custom Primer DesignOverviewWhile there are tools available for automatically designing primers (such as the NCBI Primer BLAST) often specialized PCR applications, such as amplifying fragments for Golden Gate or Gibson assembly or using different polymerases, will necessitate specific primer placements and modifications. In these cases it is important to take extra care to ensure the primers will anneal to the template and amplify well. This page presents guidelines and tools for specifically designing primers from DNA sequences, using the Benchling platform as an example. In short, you will need to: 1) Determine where to place your primers within the template sequence to amplify your desired product 2) Adjust your primer sequences to ideal annealing temperatures 3) Modify the sequences with any necessary adapters and check for inhibitory secondary structures Designing primers may require trade-offs and revisions to address specific issues that arise during the process. As such it's important to understand the needs of your specific experiment, such as specific locations in the genome, annealing temperatures, and adapter sequences, and keep those in mind while designing your primers. The examples below illustrate designing primers to amplify the downstream region of the Acinetobacter baylyi ADP1 ACIAD2049 gene for use in Golden Transformation.1) Determining Primer PlacementI. Start by identifying the region you are amplifying. Some common things to consider are:
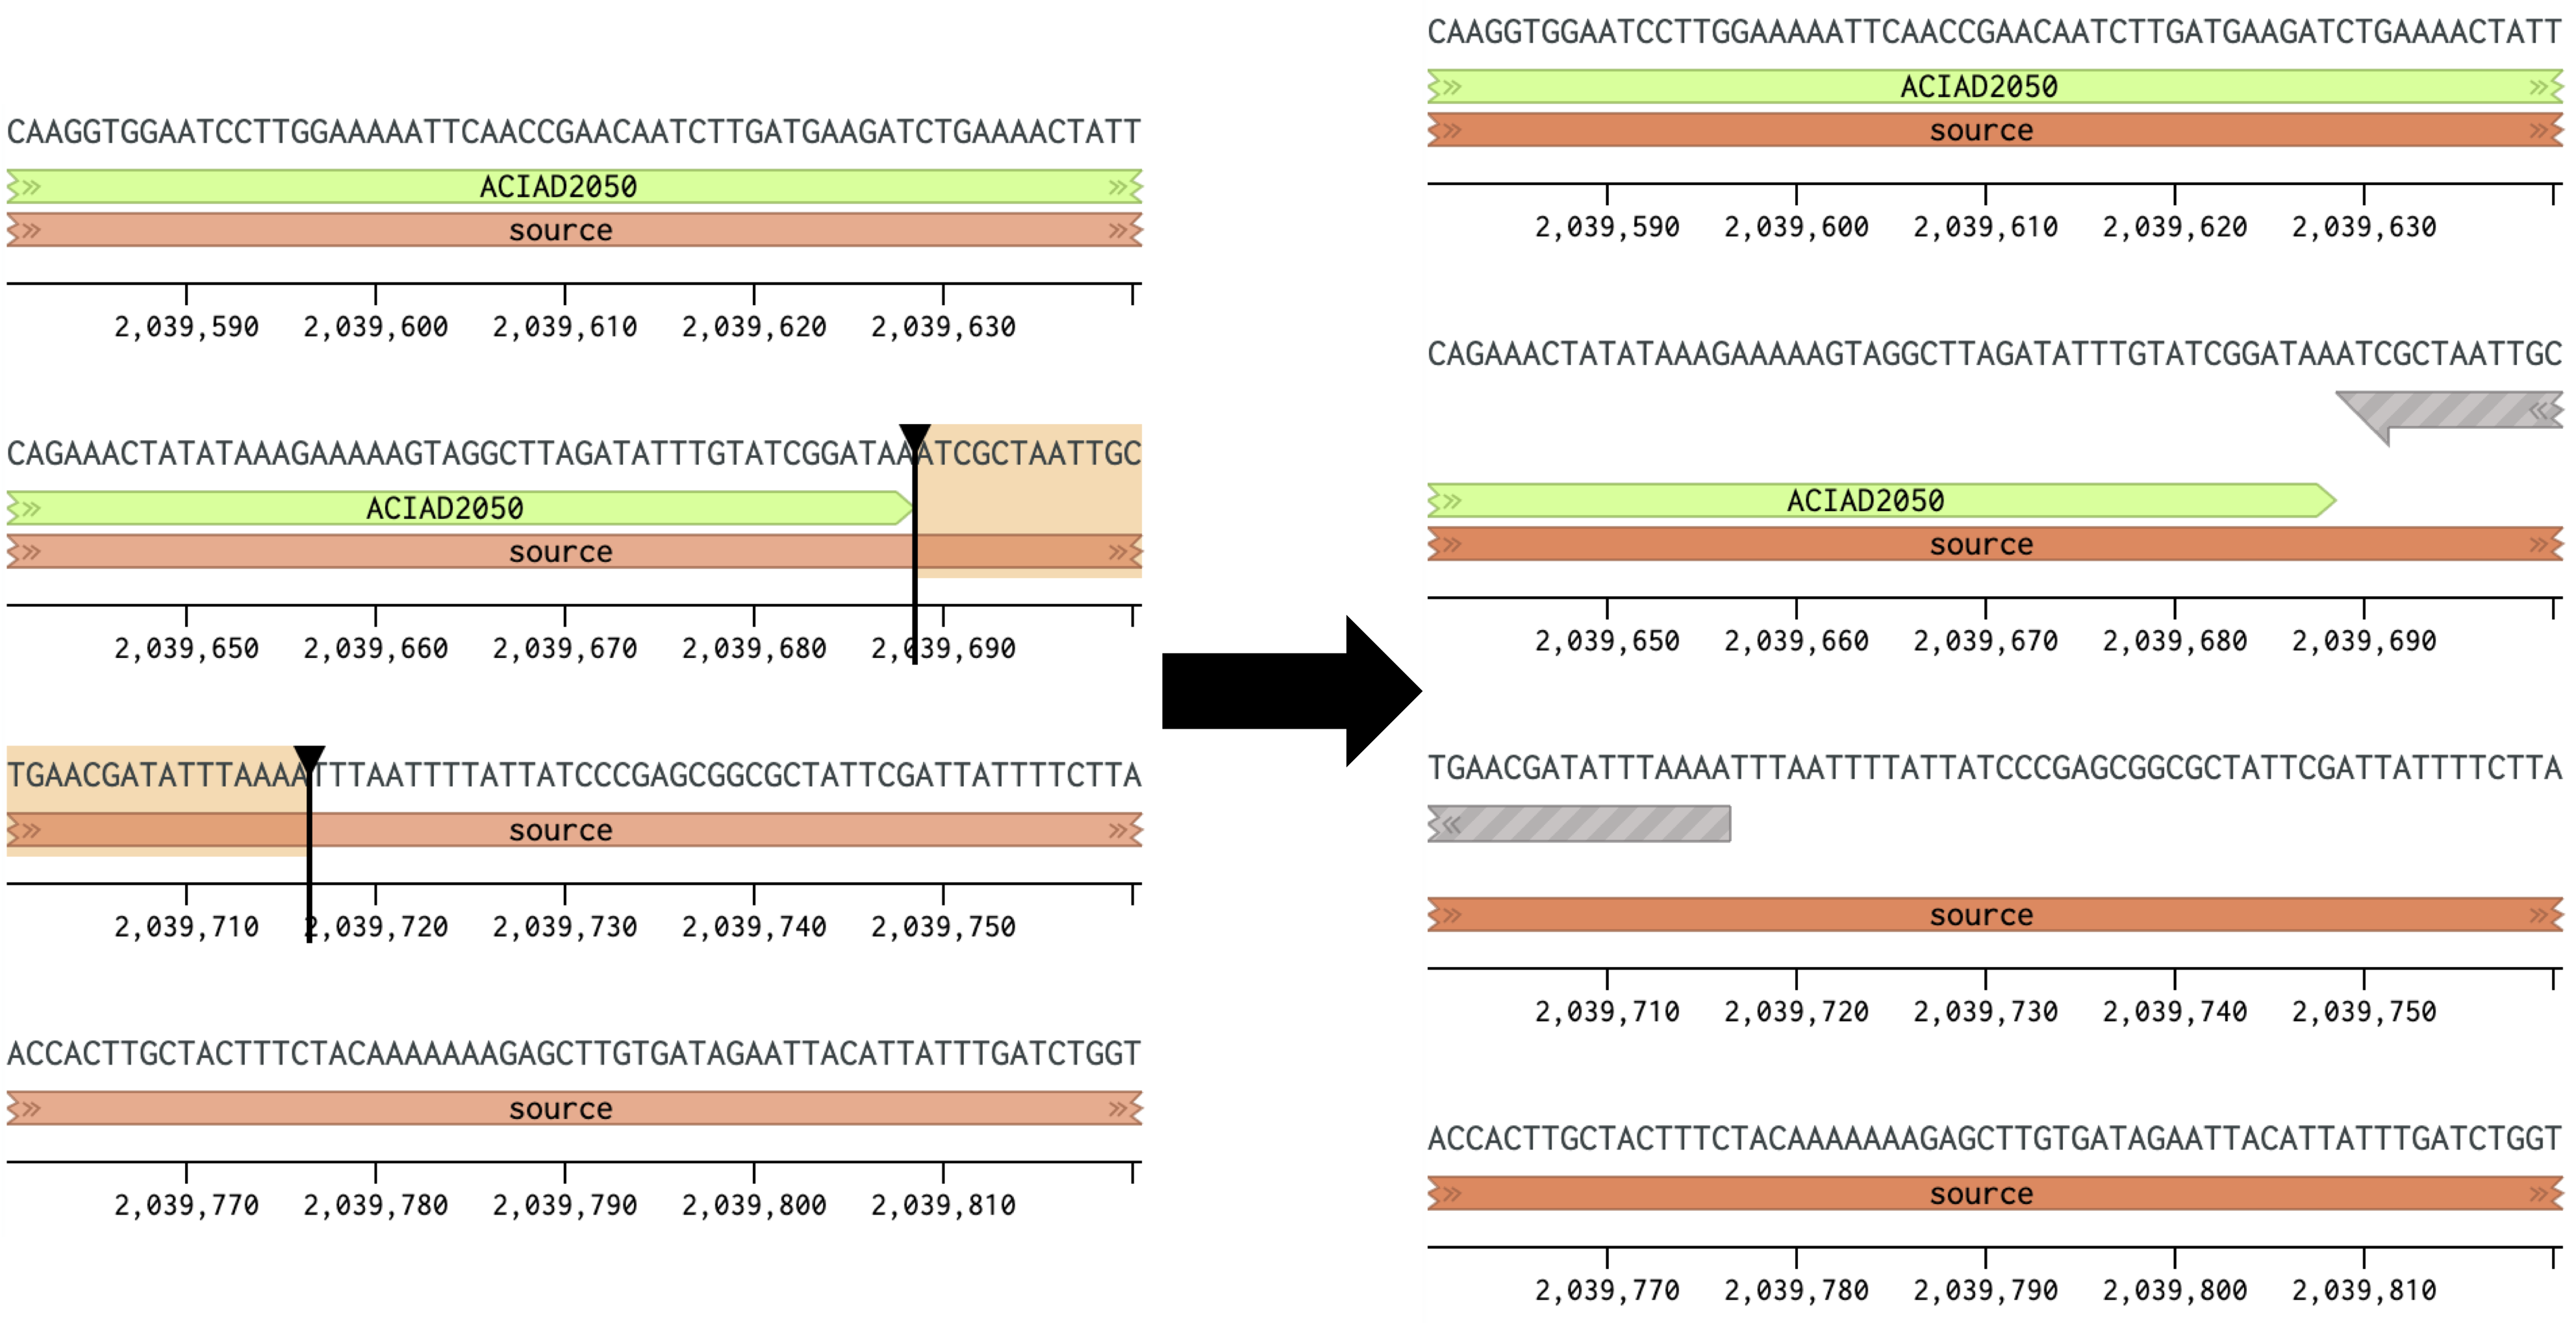
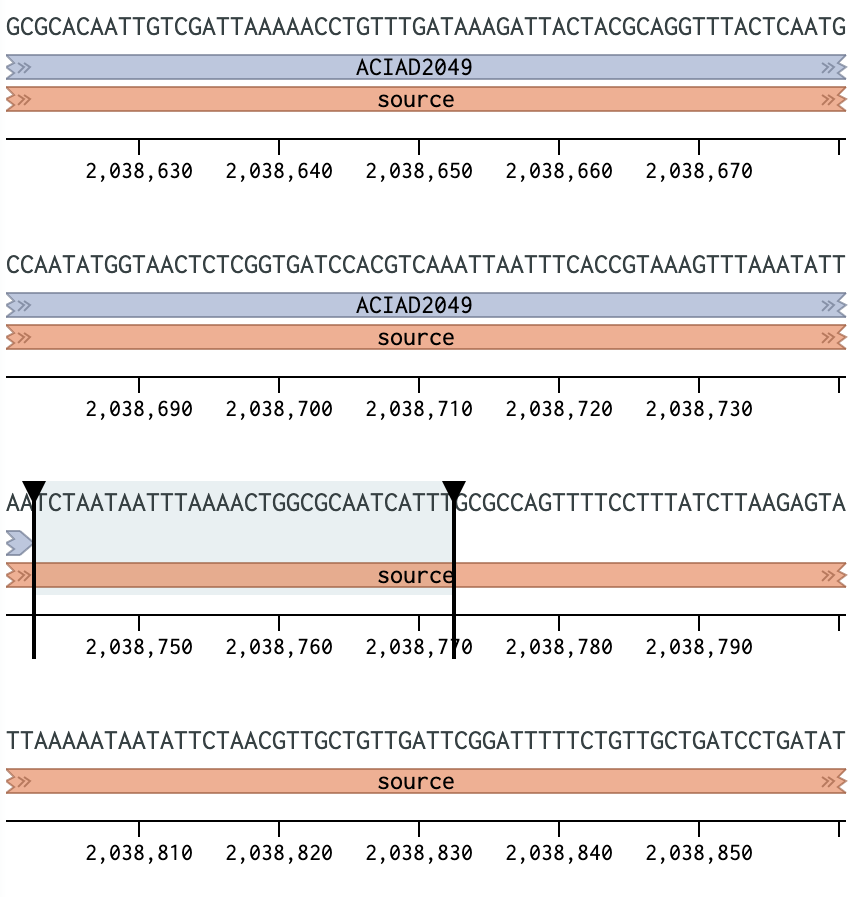
Figure 1 Placing a forward primer downstream of the ACIAD2049 gene.
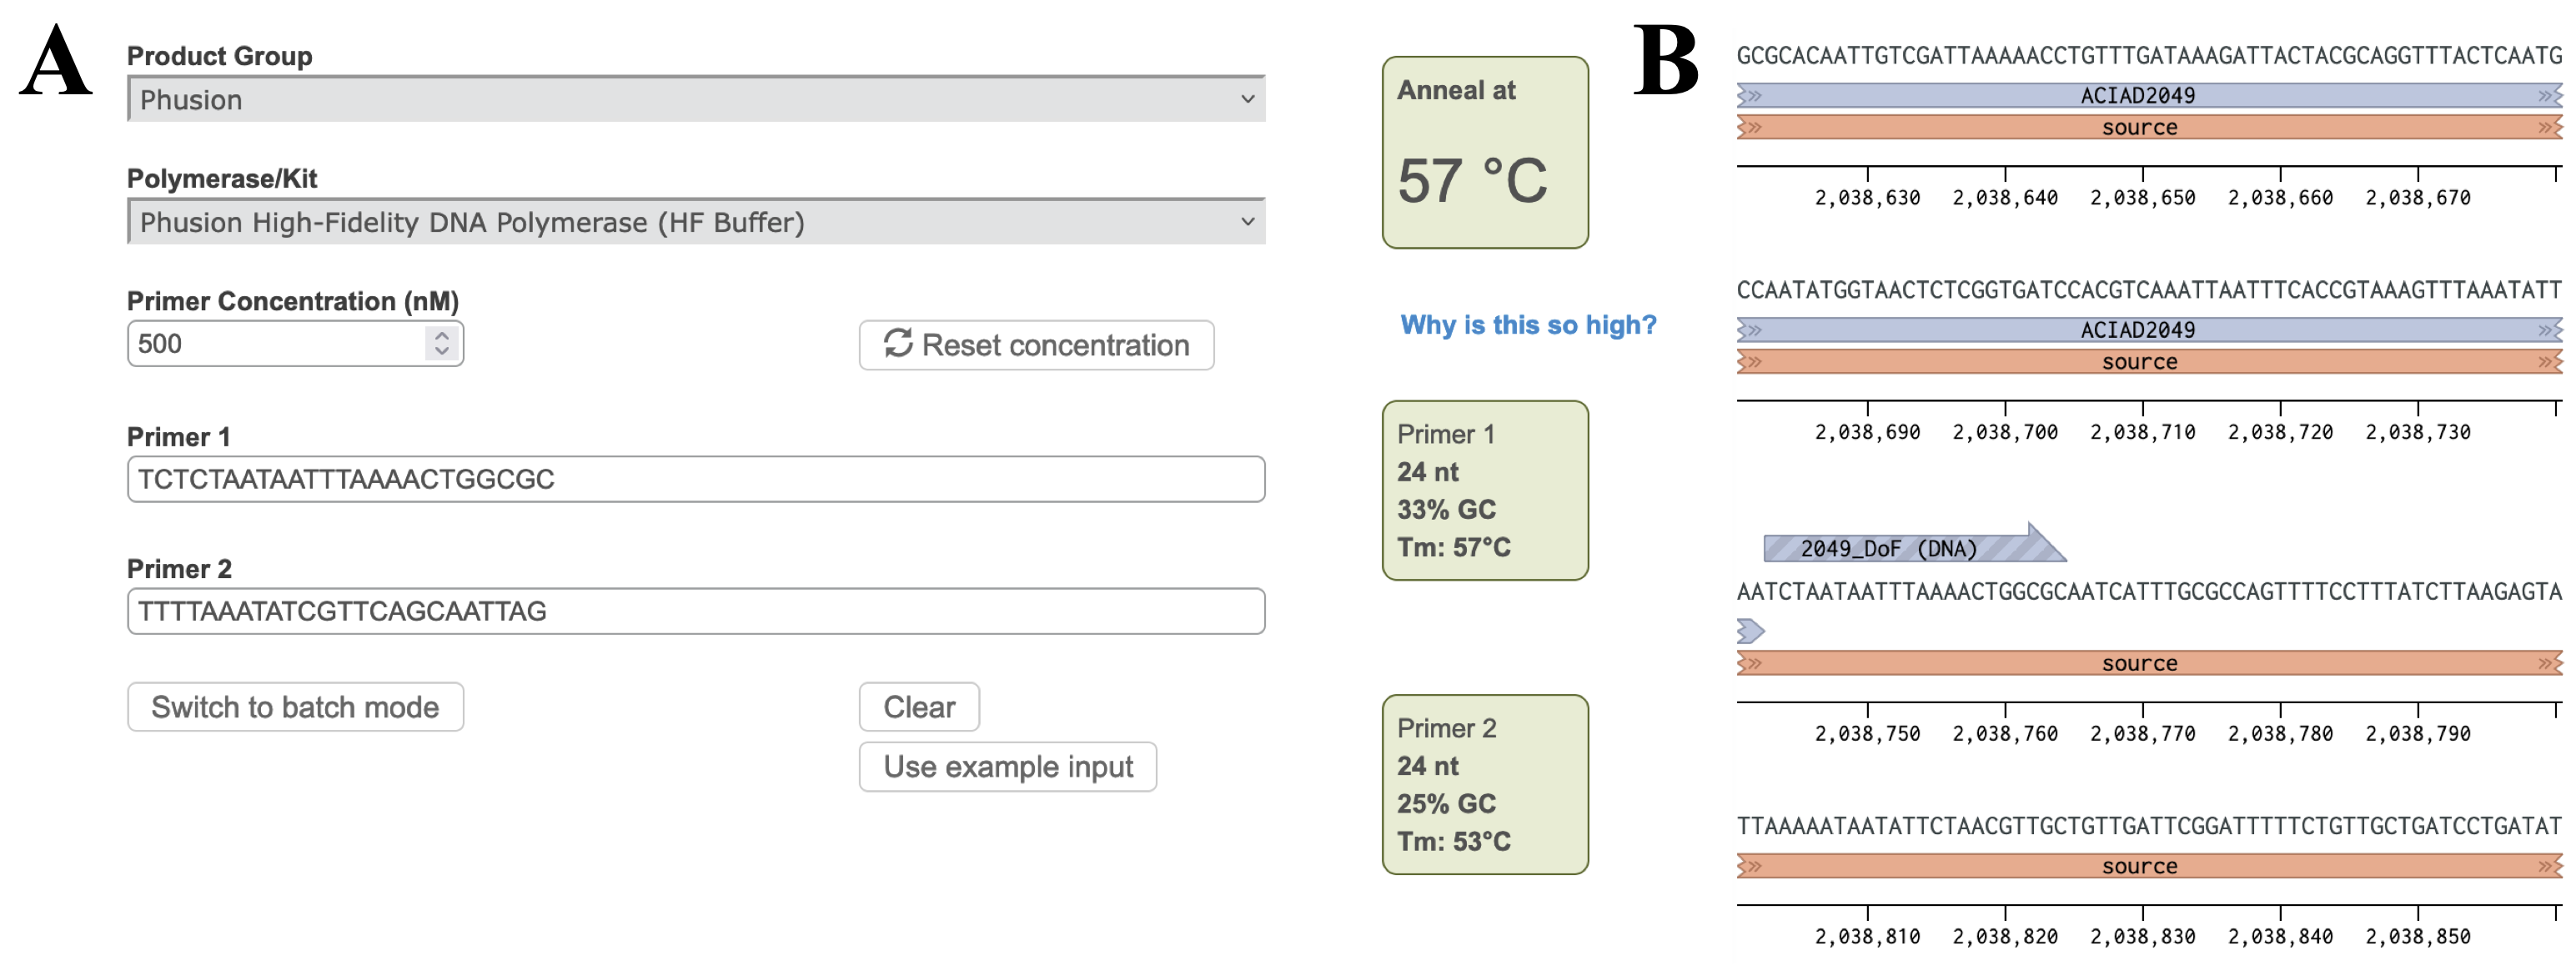
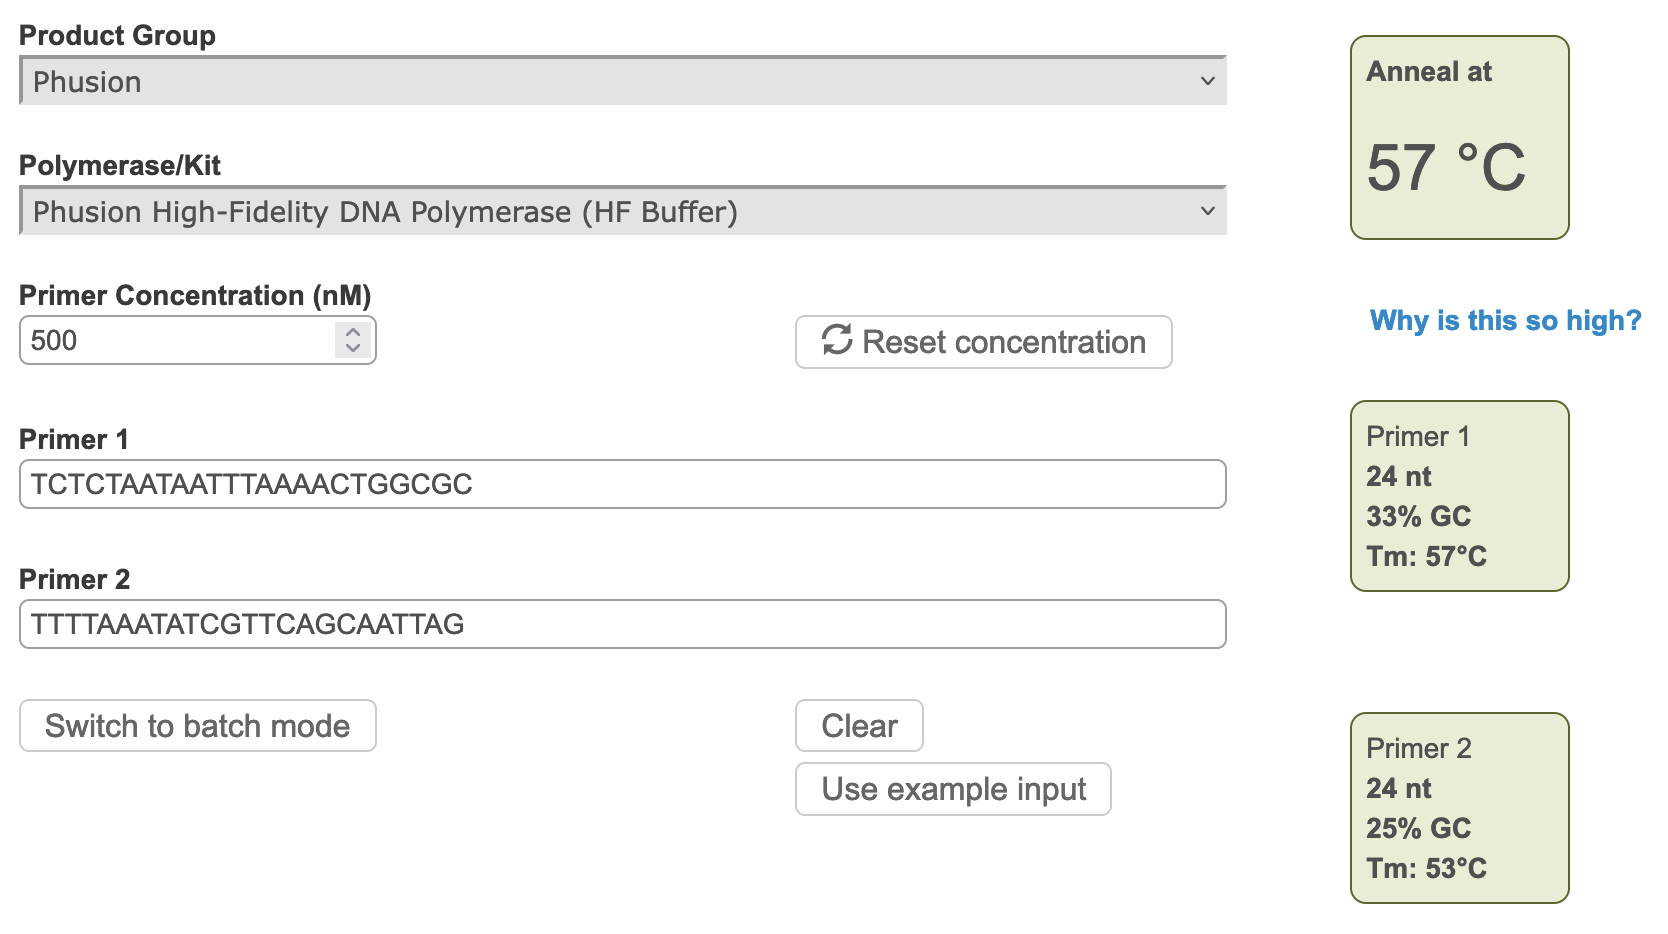
Figure 2 Placing a reverse primer downstream of the ACIAD2049 gene. In this example the primer is placed ~1000 bp downstream of the forward primer from Figure 1. 2) Calculating Annealing TemperaturesCalculate the annealing temperature for your PCR reaction using the NEB Tm Calculator. I. Select the polymerase for your PCR reaction from the drop-down menu. II. Copy ~30 bp of the forward and reverse primer sequences into the Primer 1 and Primer 2 boxes. III. Adjust the annealing temperature (Figure 3A, top right box) by removing bases from the 3' end of each primer until:
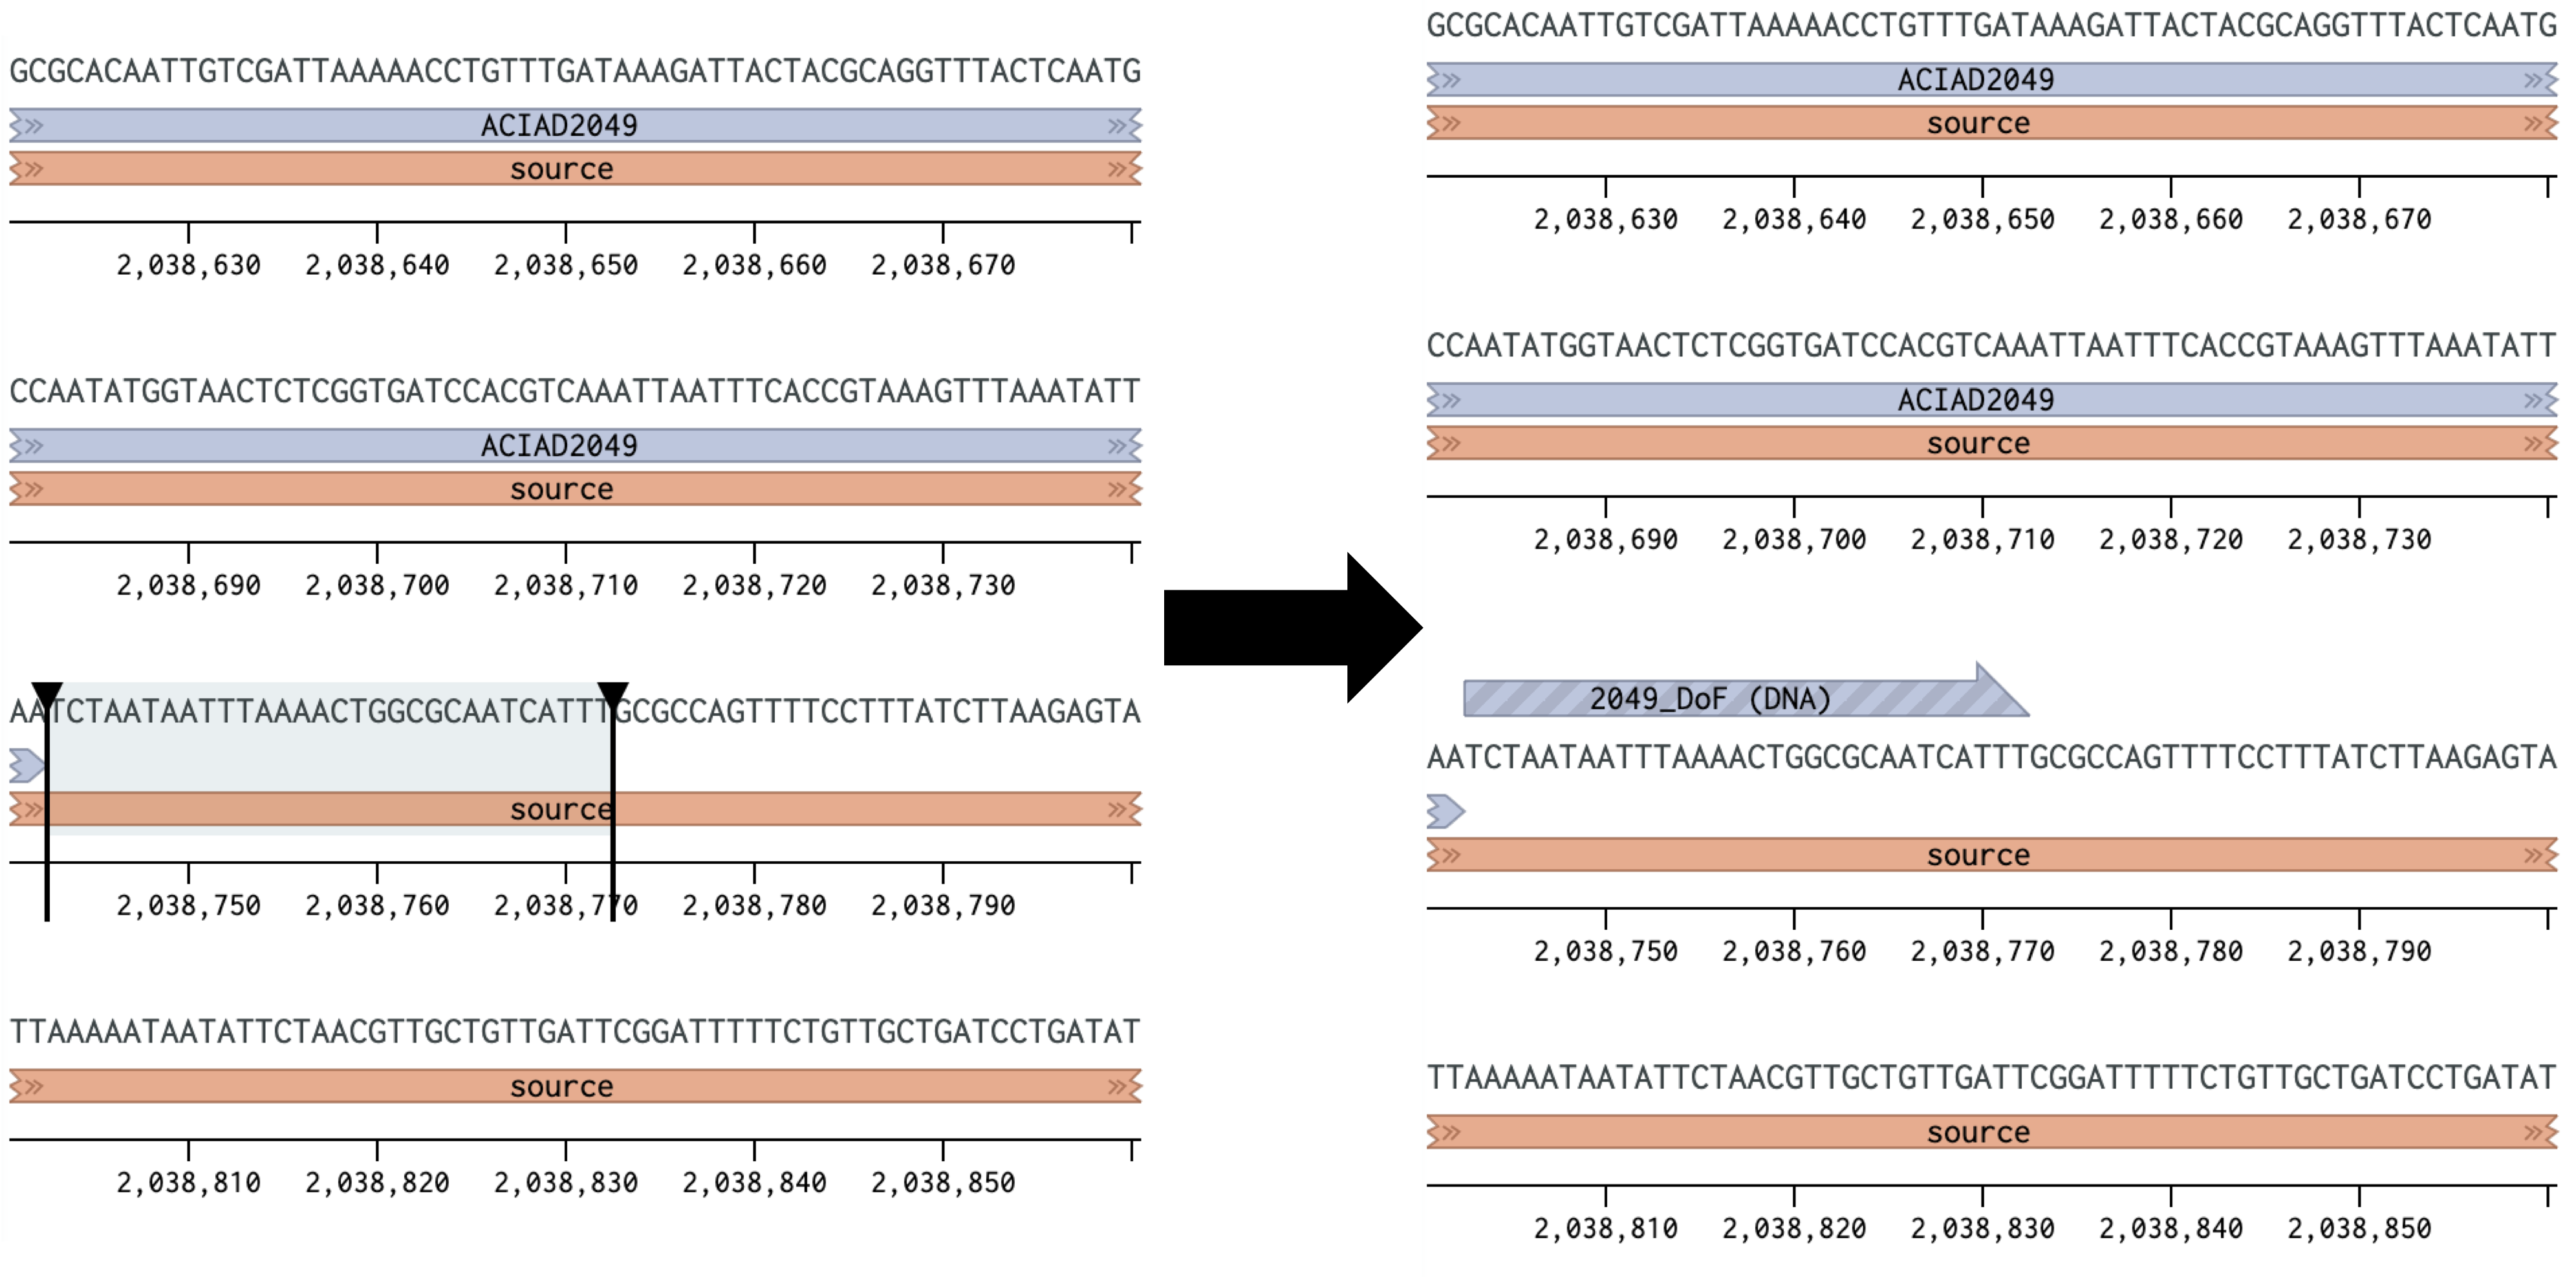
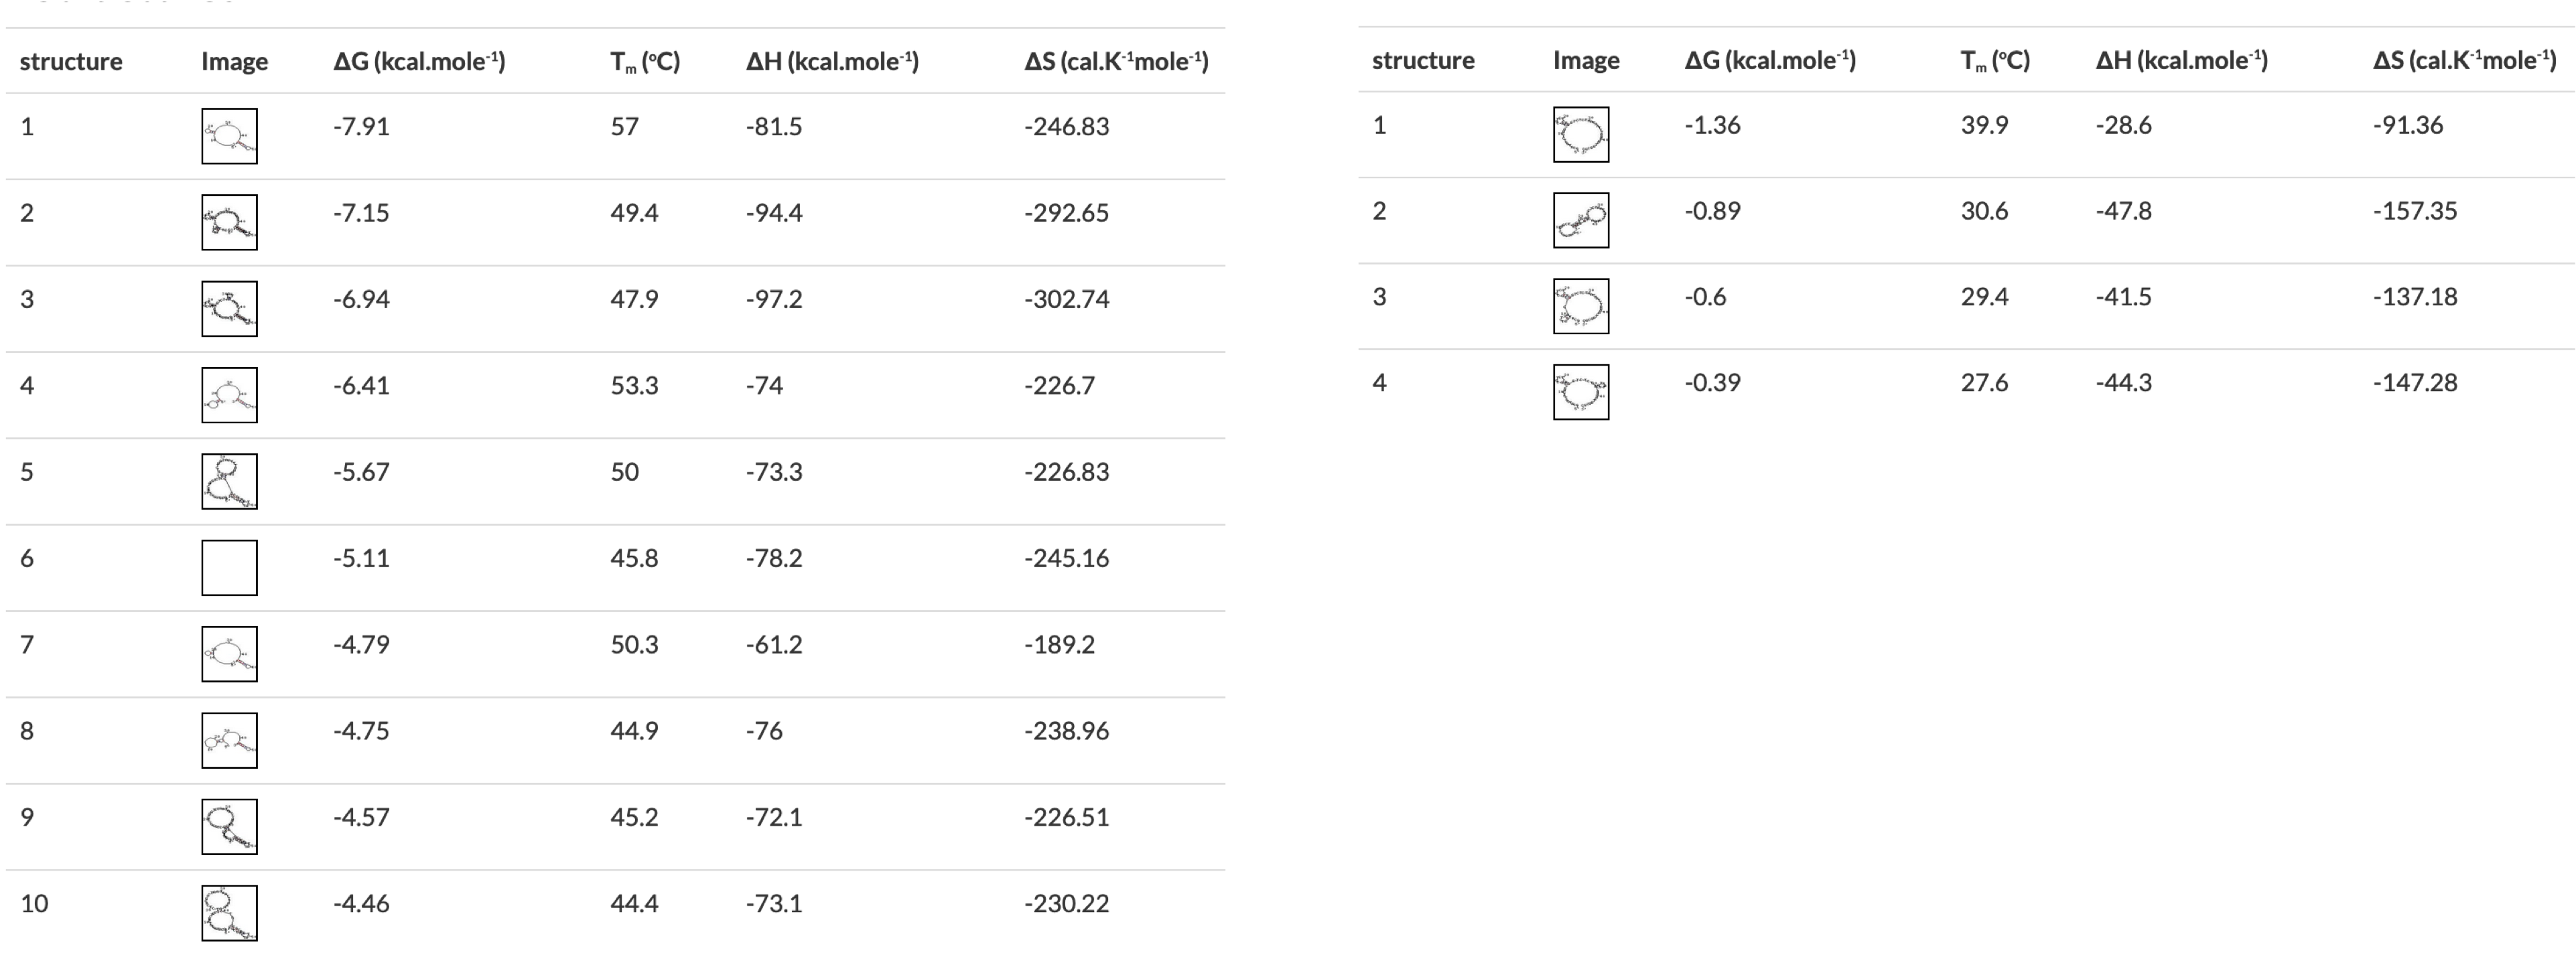
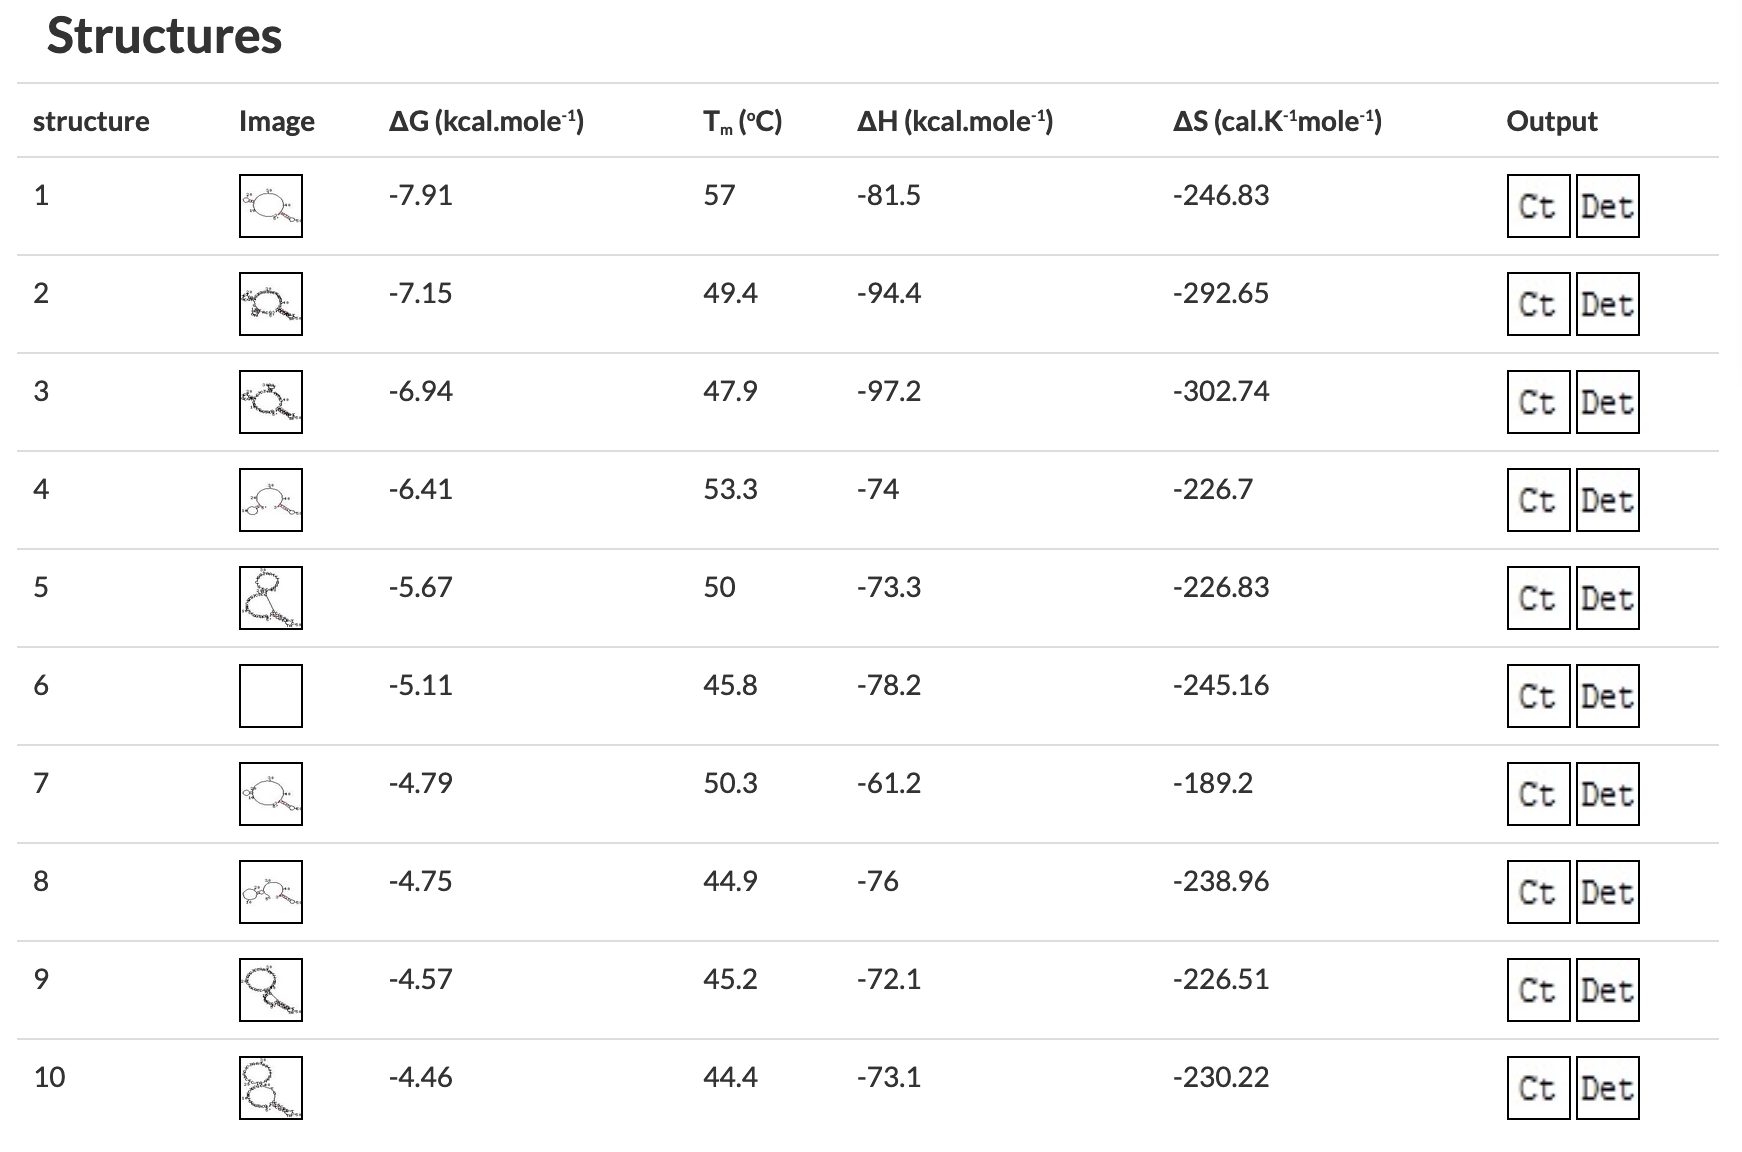
Figure 3 A) Annealing temperature calculations for ACIAD2049 downstream primers. B) ACIAD2049 downstream forward primer from Figure 1 shortened to account for annealing temperature. 3) Modifying Primer Sequences and Checking Secondary StructuresI. Add any additional modifications or adapters to the end of your sequences. Restriction sequences used for cloning need to be added to the 5' end of the primer sequence. II. Copy and paste each primer sequence into IDT's OligoAnalyzer program. Select "HAIRPIN" to analyze secondary structure formations. Structures with melting temperatures (Tm) below the annealing temperature for your reaction will melt in the thermocycler and not interfere with your reaction (Figure 4, left). Note any structures with Tms within a few degrees of your annealing temperature (Figure 4, right). III. If problematic structures were detected, modify the primer sequence to remove them. Potential solutions include:
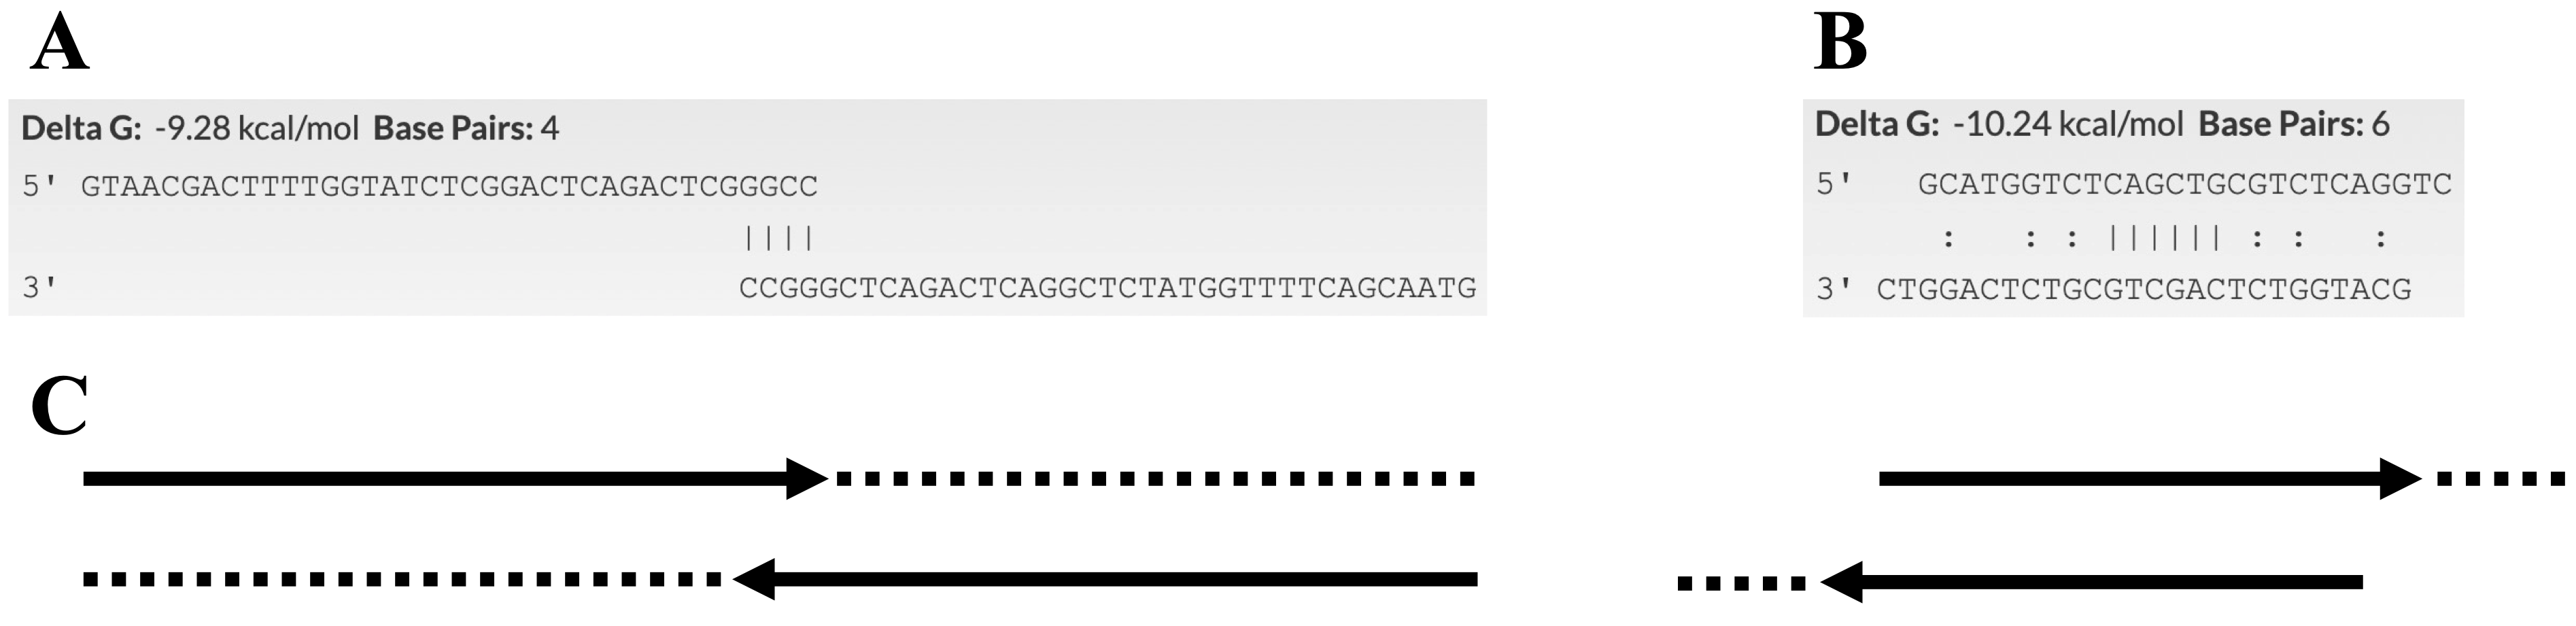
Figure 4 OligoAnalyzer results showing primers with (left) and without (right) problematic secondary structures. The structures on the right would all melt in a typical PCR reaction, the first one on the left would form in a reaction with a 57°C annealing temperature. Figure 5 Checking for self-dimerization with OligoAnalyzer. In A the self-dimer is likely to interfere with PCR reactions but the self-dimer in B is not. C) Cartoon showing the extension of each primer by PCR (dotted line) resulting in a primer dimer from the primer in A. The self-dimer in B will not be extended by PCR. 4) Receipt and ResuspensionAs with most commercially sourced DNA, primers will typically arrive as a lyophilized film at the bottom of a cryo-tube. To use them, you must resuspend them in nuclease free H2O. Make a high-concentration stock by resuspending the lyophilized primer to a standard 100 µM concentration (that's micromolar = µmol/L = pmol/µl). The amount of primer in nanomoles (nmol or nm) is provided by the vendor on the spec sheet and the side of the tube. For example, for 28.5 nmol, add 285 µl water to get a 100 µM stock solution. Pipette up and down until the film dissolves (you can watch it through the bottom of the tube) or resuspend by vortexing vigorously for 10 seconds. To prepare a 10 µM low-concentration working solution, take 10 µl stock solution and add to 90 µl water (or some multiple thereof, like 30 µl of high concentration stock + 270 µl water). If you choose to resuspend your primers to a concentration other than 100 µM, please write this clearly on the primer tube. If you are diluting from someone else's suspended primers, it wouldn't hurt to verify with them that the concentration is 100 µM before diluting. If you have a 200µM concentration, use 5µL primer in 95µL water to get a 10µM low-concentration working solution. Sometimes micromolar (µmol/L) concentrations are abbreviated in brackets, e.g. [100] mean 100 micromolar. | |||||||||||||||||||||||||
| Changed: | |||||||||||||||||||||||||
| < < | Store primers at -20°C for long term storage or -4°C for immediate use. | ||||||||||||||||||||||||
| > > | Store primers at -20°C for long term storage or 4°C for immediate use. | ||||||||||||||||||||||||
Further Reading
| |||||||||||||||||||||||||
Revision 142025-03-20 - CameronRoots
Custom Primer DesignOverviewWhile there are tools available for automatically designing primers (such as the NCBI Primer BLAST) often specialized PCR applications, such as amplifying fragments for Golden Gate or Gibson assembly or using different polymerases, will necessitate specific primer placements and modifications. In these cases it is important to take extra care to ensure the primers will anneal to the template and amplify well. This page presents guidelines and tools for specifically designing primers from DNA sequences, using the Benchling platform as an example. In short, you will need to: 1) Determine where to place your primers within the template sequence to amplify your desired product 2) Adjust your primer sequences to ideal annealing temperatures 3) Modify the sequences with any necessary adapters and check for inhibitory secondary structures Designing primers may require trade-offs and revisions to address specific issues that arise during the process. As such it's important to understand the needs of your specific experiment, such as specific locations in the genome, annealing temperatures, and adapter sequences, and keep those in mind while designing your primers. The examples below illustrate designing primers to amplify the downstream region of the Acinetobacter baylyi ADP1 ACIAD2049 gene for use in Golden Transformation.1) Determining Primer PlacementI. Start by identifying the region you are amplifying. Some common things to consider are:
Figure 1 Placing a forward primer downstream of the ACIAD2049 gene.
Figure 2 Placing a reverse primer downstream of the ACIAD2049 gene. In this example the primer is placed ~1000 bp downstream of the forward primer from Figure 1. 2) Calculating Annealing TemperaturesCalculate the annealing temperature for your PCR reaction using the NEB Tm Calculator. I. Select the polymerase for your PCR reaction from the drop-down menu. II. Copy ~30 bp of the forward and reverse primer sequences into the Primer 1 and Primer 2 boxes. III. Adjust the annealing temperature (Figure 3A, top right box) by removing bases from the 3' end of each primer until:
Figure 3 A) Annealing temperature calculations for ACIAD2049 downstream primers. B) ACIAD2049 downstream forward primer from Figure 1 shortened to account for annealing temperature. 3) Modifying Primer Sequences and Checking Secondary StructuresI. Add any additional modifications or adapters to the end of your sequences. Restriction sequences used for cloning need to be added to the 5' end of the primer sequence. II. Copy and paste each primer sequence into IDT's OligoAnalyzer program. Select "HAIRPIN" to analyze secondary structure formations. Structures with melting temperatures (Tm) below the annealing temperature for your reaction will melt in the thermocycler and not interfere with your reaction (Figure 4, left). Note any structures with Tms within a few degrees of your annealing temperature (Figure 4, right). III. If problematic structures were detected, modify the primer sequence to remove them. Potential solutions include:
Figure 4 OligoAnalyzer results showing primers with (left) and without (right) problematic secondary structures. The structures on the right would all melt in a typical PCR reaction, the first one on the left would form in a reaction with a 57°C annealing temperature. Figure 5 Checking for self-dimerization with OligoAnalyzer. In A the self-dimer is likely to interfere with PCR reactions but the self-dimer in B is not. C) Cartoon showing the extension of each primer by PCR (dotted line) resulting in a primer dimer from the primer in A. The self-dimer in B will not be extended by PCR. | |||||||||||||||||||||||||
| Added: | |||||||||||||||||||||||||
| > > |
4) Receipt and ResuspensionAs with most commercially sourced DNA, primers will typically arrive as a lyophilized film at the bottom of a cryo-tube. To use them, you must resuspend them in nuclease free H2O. Make a high-concentration stock by resuspending the lyophilized primer to a standard 100 µM concentration (that's micromolar = µmol/L = pmol/µl). The amount of primer in nanomoles (nmol or nm) is provided by the vendor on the spec sheet and the side of the tube. For example, for 28.5 nmol, add 285 µl water to get a 100 µM stock solution. Pipette up and down until the film dissolves (you can watch it through the bottom of the tube) or resuspend by vortexing vigorously for 10 seconds. To prepare a 10 µM low-concentration working solution, take 10 µl stock solution and add to 90 µl water (or some multiple thereof, like 30 µl of high concentration stock + 270 µl water). If you choose to resuspend your primers to a concentration other than 100 µM, please write this clearly on the primer tube. If you are diluting from someone else's suspended primers, it wouldn't hurt to verify with them that the concentration is 100 µM before diluting. If you have a 200µM concentration, use 5µL primer in 95µL water to get a 10µM low-concentration working solution. Sometimes micromolar (µmol/L) concentrations are abbreviated in brackets, e.g. [100] mean 100 micromolar. Store primers at -20°C for long term storage or -4°C for immediate use. | ||||||||||||||||||||||||
Further Reading
| |||||||||||||||||||||||||
Revision 132023-03-06 - IsaacGifford
| |||||||||||||||||||||||||
| Deleted: | |||||||||||||||||||||||||
| < < | Page under construction as of 2/22/2023 | ||||||||||||||||||||||||
Custom Primer DesignOverviewWhile there are tools available for automatically designing primers (such as the NCBI Primer BLAST) often specialized PCR applications, such as amplifying fragments for Golden Gate or Gibson assembly or using different polymerases, will necessitate specific primer placements and modifications. In these cases it is important to take extra care to ensure the primers will anneal to the template and amplify well. This page presents guidelines and tools for specifically designing primers from DNA sequences, using the Benchling platform as an example. In short, you will need to: 1) Determine where to place your primers within the template sequence to amplify your desired product 2) Adjust your primer sequences to ideal annealing temperatures 3) Modify the sequences with any necessary adapters and check for inhibitory secondary structures Designing primers may require trade-offs and revisions to address specific issues that arise during the process. As such it's important to understand the needs of your specific experiment, such as specific locations in the genome, annealing temperatures, and adapter sequences, and keep those in mind while designing your primers. The examples below illustrate designing primers to amplify the downstream region of the Acinetobacter baylyi ADP1 ACIAD2049 gene for use in Golden Transformation.1) Determining Primer PlacementI. Start by identifying the region you are amplifying. Some common things to consider are:
Figure 1 Placing a forward primer downstream of the ACIAD2049 gene.
Figure 2 Placing a reverse primer downstream of the ACIAD2049 gene. In this example the primer is placed ~1000 bp downstream of the forward primer from Figure 1. 2) Calculating Annealing TemperaturesCalculate the annealing temperature for your PCR reaction using the NEB Tm Calculator. I. Select the polymerase for your PCR reaction from the drop-down menu. II. Copy ~30 bp of the forward and reverse primer sequences into the Primer 1 and Primer 2 boxes. III. Adjust the annealing temperature (Figure 3A, top right box) by removing bases from the 3' end of each primer until:
Figure 3 A) Annealing temperature calculations for ACIAD2049 downstream primers. B) ACIAD2049 downstream forward primer from Figure 1 shortened to account for annealing temperature. 3) Modifying Primer Sequences and Checking Secondary StructuresI. Add any additional modifications or adapters to the end of your sequences. Restriction sequences used for cloning need to be added to the 5' end of the primer sequence. II. Copy and paste each primer sequence into IDT's OligoAnalyzer program. Select "HAIRPIN" to analyze secondary structure formations. Structures with melting temperatures (Tm) below the annealing temperature for your reaction will melt in the thermocycler and not interfere with your reaction (Figure 4, left). Note any structures with Tms within a few degrees of your annealing temperature (Figure 4, right). III. If problematic structures were detected, modify the primer sequence to remove them. Potential solutions include:
Figure 4 OligoAnalyzer results showing primers with (left) and without (right) problematic secondary structures. The structures on the right would all melt in a typical PCR reaction, the first one on the left would form in a reaction with a 57°C annealing temperature. Figure 5 Checking for self-dimerization with OligoAnalyzer. In A the self-dimer is likely to interfere with PCR reactions but the self-dimer in B is not. C) Cartoon showing the extension of each primer by PCR (dotted line) resulting in a primer dimer from the primer in A. The self-dimer in B will not be extended by PCR. Further Reading
| |||||||||||||||||||||||||
Revision 122023-03-02 - IsaacGifford
Custom Primer DesignOverviewWhile there are tools available for automatically designing primers (such as the NCBI Primer BLAST) often specialized PCR applications, such as amplifying fragments for Golden Gate or Gibson assembly or using different polymerases, will necessitate specific primer placements and modifications. In these cases it is important to take extra care to ensure the primers will anneal to the template and amplify well. This page presents guidelines and tools for specifically designing primers from DNA sequences, using the Benchling platform as an example. In short, you will need to: 1) Determine where to place your primers within the template sequence to amplify your desired product 2) Adjust your primer sequences to ideal annealing temperatures 3) Modify the sequences with any necessary adapters and check for inhibitory secondary structures Designing primers may require trade-offs and revisions to address specific issues that arise during the process. As such it's important to understand the needs of your specific experiment, such as specific locations in the genome, annealing temperatures, and adapter sequences, and keep those in mind while designing your primers. The examples below illustrate designing primers to amplify the downstream region of the Acinetobacter baylyi ADP1 ACIAD2049 gene for use in Golden Transformation.1) Determining Primer PlacementI. Start by identifying the region you are amplifying. Some common things to consider are:
Figure 1 Placing a forward primer downstream of the ACIAD2049 gene.
Figure 2 Placing a reverse primer downstream of the ACIAD2049 gene. In this example the primer is placed ~1000 bp downstream of the forward primer from Figure 1. 2) Calculating Annealing TemperaturesCalculate the annealing temperature for your PCR reaction using the NEB Tm Calculator. I. Select the polymerase for your PCR reaction from the drop-down menu. II. Copy ~30 bp of the forward and reverse primer sequences into the Primer 1 and Primer 2 boxes. III. Adjust the annealing temperature (Figure 3A, top right box) by removing bases from the 3' end of each primer until: | |||||||||||||||||||||||
| Changed: | |||||||||||||||||||||||
| < < |
| ||||||||||||||||||||||
| > > |
| ||||||||||||||||||||||
Figure 3 A) Annealing temperature calculations for ACIAD2049 downstream primers. B) ACIAD2049 downstream forward primer from Figure 1 shortened to account for annealing temperature. 3) Modifying Primer Sequences and Checking Secondary StructuresI. Add any additional modifications or adapters to the end of your sequences. Restriction sequences used for cloning need to be added to the 5' end of the primer sequence. II. Copy and paste each primer sequence into IDT's OligoAnalyzer program. Select "HAIRPIN" to analyze secondary structure formations. Structures with melting temperatures (Tm) below the annealing temperature for your reaction will melt in the thermocycler and not interfere with your reaction (Figure 4, left). Note any structures with Tms within a few degrees of your annealing temperature (Figure 4, right). III. If problematic structures were detected, modify the primer sequence to remove them. Potential solutions include:
| |||||||||||||||||||||||
| Deleted: | |||||||||||||||||||||||
| < < | IV. If you have changed one or both primer sequences you will need to recalculate your annealing temperature as above and confirm that it is still within the desired range (make sure to remove any adapter sequences before calculating your annealing temperature. Use only the sequence that anneals to the template DNA). Add or remove additional bases if necessary to bring the annealing temperature back to the desired range. | ||||||||||||||||||||||
|
Figure 4 OligoAnalyzer results showing primers with (left) and without (right) problematic secondary structures. The structures on the right would all melt in a typical PCR reaction, the first one on the left would form in a reaction with a 57°C annealing temperature. | |||||||||||||||||||||||
| Changed: | |||||||||||||||||||||||
| < < | Additional Notes | ||||||||||||||||||||||
| > > | IV. Selecting "SELF-DIMER" or "HETERO-DIMER" in OligoAnalyzer will check for other binding interactions between a primer and itself or another primer, respectively. IDT suggests that interactions with a ΔG of -9 kcal/mol or lower may interfere with PCR reactions, although this is more likely with dimers arranged such that they form primer dimers (Figure 5). If problematic dimers are detected, remove them by following the suggestions in 3.III, above. | ||||||||||||||||||||||
| Deleted: | |||||||||||||||||||||||
| < < |
| ||||||||||||||||||||||
| Added: | |||||||||||||||||||||||
| > > | Figure 5 Checking for self-dimerization with OligoAnalyzer. In A the self-dimer is likely to interfere with PCR reactions but the self-dimer in B is not. C) Cartoon showing the extension of each primer by PCR (dotted line) resulting in a primer dimer from the primer in A. The self-dimer in B will not be extended by PCR. | ||||||||||||||||||||||
Further Reading
| |||||||||||||||||||||||
| Added: | |||||||||||||||||||||||
| > > |
| ||||||||||||||||||||||
Revision 112023-03-01 - JeffreyBarrick
Custom Primer DesignOverviewWhile there are tools available for automatically designing primers (such as the NCBI Primer BLAST) often specialized PCR applications, such as amplifying fragments for Golden Gate or Gibson assembly or using different polymerases, will necessitate specific primer placements and modifications. In these cases it is important to take extra care to ensure the primers will anneal to the template and amplify well. This page presents guidelines and tools for specifically designing primers from DNA sequences, using the Benchling platform as an example. In short, you will need to: | |||||||||||||||||||||||
| Deleted: | |||||||||||||||||||||||
| < < | 1) determine where to place your primers within the template sequence to amplify your desired product 2) adjust your primer sequences to ideal annealing temperatures 3) modify the sequences with any necessary adapters and check for inhibitory secondary structures | ||||||||||||||||||||||
| Added: | |||||||||||||||||||||||
| > > | 1) Determine where to place your primers within the template sequence to amplify your desired product 2) Adjust your primer sequences to ideal annealing temperatures 3) Modify the sequences with any necessary adapters and check for inhibitory secondary structures | ||||||||||||||||||||||
Designing primers may require trade-offs and revisions to address specific issues that arise during the process. As such it's important to understand the needs of your specific experiment, such as specific locations in the genome, annealing temperatures, and adapter sequences, and keep those in mind while designing your primers.
The examples below illustrate designing primers to amplify the downstream region of the Acinetobacter baylyi ADP1 ACIAD2049 gene for use in Golden Transformation.
1) Determining Primer PlacementI. Start by identifying the region you are amplifying. Some common things to consider are:
| |||||||||||||||||||||||
| Changed: | |||||||||||||||||||||||
| < < |
| ||||||||||||||||||||||
| > > |
| ||||||||||||||||||||||
Figure 1 Placing a forward primer downstream of the ACIAD2049 gene. | |||||||||||||||||||||||
| Changed: | |||||||||||||||||||||||
| < < |
| ||||||||||||||||||||||
| > > |
| ||||||||||||||||||||||
|
Figure 2 Placing a reverse primer downstream of the ACIAD2049 gene. In this example the primer is placed ~1000 bp downstream of the forward primer from Figure 1. 2) Calculating Annealing TemperaturesCalculate the annealing temperature for your PCR reaction using the NEB Tm Calculator. I. Select the polymerase for your PCR reaction from the drop-down menu. II. Copy ~30 bp of the forward and reverse primer sequences into the Primer 1 and Primer 2 boxes. III. Adjust the annealing temperature (Figure 3A, top right box) by removing bases from the 3' end of each primer until:
| |||||||||||||||||||||||
| Changed: | |||||||||||||||||||||||
| < < |
| ||||||||||||||||||||||
| > > |
| ||||||||||||||||||||||
| |||||||||||||||||||||||
| Changed: | |||||||||||||||||||||||
| < < |
| ||||||||||||||||||||||
| > > |
| ||||||||||||||||||||||
|
Figure 3 A) Annealing temperature calculations for ACIAD2049 downstream primers. B) ACIAD2049 downstream forward primer from Figure 1 shortened to account for annealing temperature. 3) Modifying Primer Sequences and Checking Secondary StructuresI. Add any additional modifications or adapters to the end of your sequences. Restriction sequences used for cloning need to be added to the 5' end of the primer sequence. II. Copy and paste each primer sequence into IDT's OligoAnalyzer program. Select "HAIRPIN" to analyze secondary structure formations. Structures with melting temperatures (Tm) below the annealing temperature for your reaction will melt in the thermocycler and not interfere with your reaction (Figure 4, left). Note any structures with Tms within a few degrees of your annealing temperature (Figure 4, right). III. If problematic structures were detected, modify the primer sequence to remove them. Potential solutions include:
| |||||||||||||||||||||||
| Changed: | |||||||||||||||||||||||
| < < | Figure 4 OligoAnalyzer results showing primers without (left) and with (right) problematic secondary structures. The structures on the left would all melt in a typical PCR reaction, the first one on the right would form in a reaction with a 57°C annealing temperature. | ||||||||||||||||||||||
| > > | Figure 4 OligoAnalyzer results showing primers with (left) and without (right) problematic secondary structures. The structures on the right would all melt in a typical PCR reaction, the first one on the left would form in a reaction with a 57°C annealing temperature. | ||||||||||||||||||||||

Additional Notes
Further Reading
| |||||||||||||||||||||||
Revision 102023-02-28 - IsaacGifford
Custom Primer DesignOverviewWhile there are tools available for automatically designing primers (such as the NCBI Primer BLAST) often specialized PCR applications, such as amplifying fragments for Golden Gate or Gibson assembly or using different polymerases, will necessitate specific primer placements and modifications. In these cases it is important to take extra care to ensure the primers will anneal to the template and amplify well. This page presents guidelines and tools for specifically designing primers from DNA sequences, using the Benchling platform as an example. In short, you will need to: 1) determine where to place your primers within the template sequence to amplify your desired product 2) adjust your primer sequences to ideal annealing temperatures 3) modify the sequences with any necessary adapters and check for inhibitory secondary structures Designing primers may require trade-offs and revisions to address specific issues that arise during the process. As such it's important to understand the needs of your specific experiment, such as specific locations in the genome, annealing temperatures, and adapter sequences, and keep those in mind while designing your primers. The examples below illustrate designing primers to amplify the downstream region of the Acinetobacter baylyi ADP1 ACIAD2049 gene for use in Golden Transformation.1) Determining Primer PlacementI. Start by identifying the region you are amplifying. Some common things to consider are:
| |||||||||||||||||||||
| Changed: | |||||||||||||||||||||
| < < |
| ||||||||||||||||||||
| > > |
| ||||||||||||||||||||
| Added: | |||||||||||||||||||||
| > > | III. Highlight ~30 base pairs at the upstream end of the fragment you want to amplify. On Benchling, right-click the highlighted region and select "Create primer" and select "Forward primer" to mark it (Figure 1). The final primer sequence will be refined in parts 2 and 3, below. | ||||||||||||||||||||
| Changed: | |||||||||||||||||||||
| < < | Figure 1 Placing a primer downstream of the ACIAD2049 gene. | ||||||||||||||||||||
| > > | Figure 1 Placing a forward primer downstream of the ACIAD2049 gene. | ||||||||||||||||||||
 | |||||||||||||||||||||
| Added: | |||||||||||||||||||||
| > > | IV. Highlight ~30 base pairs at the downstream end of the fragment you want to amplify. Create a primer as before, but select "Reverse primer" instead (Figure 2).
Figure 2 Placing a reverse primer downstream of the ACIAD2049 gene. In this example the primer is placed ~1000 bp downstream of the forward primer from Figure 1. | ||||||||||||||||||||
Note GC content can be a useful guide for choosing a good primer location, as equal base distributions (i.e. ~50% GC) are less likely to form detrimental secondary structures. However, this may not be a realistic guideline for all primers as different genomes and locations (such as near promoters) can vary considerably in GC content.
2) Calculating Annealing TemperaturesCalculate the annealing temperature for your PCR reaction using the NEB Tm Calculator. I. Select the polymerase for your PCR reaction from the drop-down menu. II. Copy ~30 bp of the forward and reverse primer sequences into the Primer 1 and Primer 2 boxes. | |||||||||||||||||||||
| Changed: | |||||||||||||||||||||
| < < | III. Adjust the annealing temperature (top right box) by removing bases from the 3' end of each primer until: | ||||||||||||||||||||
| > > | III. Adjust the annealing temperature (Figure 3A, top right box) by removing bases from the 3' end of each primer until: | ||||||||||||||||||||
| |||||||||||||||||||||
| Changed: | |||||||||||||||||||||
| < < | Figure 2 A) Annealing temperature calculations for ACIAD2049 downstream primers. B) ACIAD2049 downstream forward primer from Figure 1 shortened to account for annealing temperature. | ||||||||||||||||||||
| > > | Figure 3 A) Annealing temperature calculations for ACIAD2049 downstream primers. B) ACIAD2049 downstream forward primer from Figure 1 shortened to account for annealing temperature. | ||||||||||||||||||||
3) Modifying Primer Sequences and Checking Secondary StructuresI. Add any additional modifications or adapters to the end of your sequences. Restriction sequences used for cloning need to be added to the 5' end of the primer sequence. | |||||||||||||||||||||
| Changed: | |||||||||||||||||||||
| < < | II. Copy and paste each primer sequence into IDT's OligoAnalyzer program. Select "HAIRPIN" to analyze secondary structure formations. Structures with melting temperatures (Tm) below the annealing temperature for your reaction will melt in the thermocycler and not interfere with your reaction (Figure 3, left). Note any structures with Tms within a few degrees of your annealing temperature (Figure 3, right). | ||||||||||||||||||||
| > > | II. Copy and paste each primer sequence into IDT's OligoAnalyzer program. Select "HAIRPIN" to analyze secondary structure formations. Structures with melting temperatures (Tm) below the annealing temperature for your reaction will melt in the thermocycler and not interfere with your reaction (Figure 4, left). Note any structures with Tms within a few degrees of your annealing temperature (Figure 4, right). | ||||||||||||||||||||
III. If problematic structures were detected, modify the primer sequence to remove them. Potential solutions include:
| |||||||||||||||||||||
| Changed: | |||||||||||||||||||||
| < < |
| ||||||||||||||||||||
| > > |
| ||||||||||||||||||||
| |||||||||||||||||||||
| Changed: | |||||||||||||||||||||
| < < | Figure 3 OligoAnalyzer results showing primers without (left) and with (right) problematic secondary structures. The structures on the left would all melt in a typical PCR reaction, the first one on the right would form in a reaction with a 57°C annealing temperature. | ||||||||||||||||||||
| > > | Figure 4 OligoAnalyzer results showing primers without (left) and with (right) problematic secondary structures. The structures on the left would all melt in a typical PCR reaction, the first one on the right would form in a reaction with a 57°C annealing temperature. | ||||||||||||||||||||
| |||||||||||||||||||||
| Added: | |||||||||||||||||||||
| > > | Additional Notes
| ||||||||||||||||||||
Further Reading
| |||||||||||||||||||||
| Added: | |||||||||||||||||||||
| > > |
| ||||||||||||||||||||
Revision 92023-02-27 - IsaacGifford
Custom Primer DesignOverviewWhile there are tools available for automatically designing primers (such as the NCBI Primer BLAST) often specialized PCR applications, such as amplifying fragments for Golden Gate or Gibson assembly or using different polymerases, will necessitate specific primer placements and modifications. In these cases it is important to take extra care to ensure the primers will anneal to the template and amplify well. This page presents guidelines and tools for specifically designing primers from DNA sequences, using the Benchling platform as an example. In short, you will need to: 1) determine where to place your primers within the template sequence to amplify your desired product 2) adjust your primer sequences to ideal annealing temperatures 3) modify the sequences with any necessary adapters and check for inhibitory secondary structures Designing primers may require trade-offs and revisions to address specific issues that arise during the process. As such it's important to understand the needs of your specific experiment, such as specific locations in the genome, annealing temperatures, and adapter sequences, and keep those in mind while designing your primers. The examples below illustrate designing primers to amplify the downstream region of the Acinetobacter baylyi ADP1 ACIAD2049 gene for use in Golden Transformation.1) Determining Primer PlacementI. Start by identifying the region you are amplifying. Some common things to consider are:
Figure 1 Placing a primer downstream of the ACIAD2049 gene. 2) Calculating Annealing TemperaturesCalculate the annealing temperature for your PCR reaction using the NEB Tm Calculator. I. Select the polymerase for your PCR reaction from the drop-down menu. II. Copy ~30 bp of the forward and reverse primer sequences into the Primer 1 and Primer 2 boxes. III. Adjust the annealing temperature (top right box) by removing bases from the 3' end of each primer until:
| |||||||||||||||||||||
| Changed: | |||||||||||||||||||||
| < < |
| ||||||||||||||||||||
| > > |
| ||||||||||||||||||||
|
Figure 2 A) Annealing temperature calculations for ACIAD2049 downstream primers. B) ACIAD2049 downstream forward primer from Figure 1 shortened to account for annealing temperature. 3) Modifying Primer Sequences and Checking Secondary StructuresI. Add any additional modifications or adapters to the end of your sequences. Restriction sequences used for cloning need to be added to the 5' end of the primer sequence. II. Copy and paste each primer sequence into IDT's OligoAnalyzer program. Select "HAIRPIN" to analyze secondary structure formations. Structures with melting temperatures (Tm) below the annealing temperature for your reaction will melt in the thermocycler and not interfere with your reaction (Figure 3, left). Note any structures with Tms within a few degrees of your annealing temperature (Figure 3, right). III. If problematic structures were detected, modify the primer sequence to remove them. Potential solutions include:
Figure 3 OligoAnalyzer results showing primers without (left) and with (right) problematic secondary structures. The structures on the left would all melt in a typical PCR reaction, the first one on the right would form in a reaction with a 57°C annealing temperature. | |||||||||||||||||||||
| Changed: | |||||||||||||||||||||
| < < |  | ||||||||||||||||||||
| > > | | ||||||||||||||||||||
Further Reading
| |||||||||||||||||||||
Revision 82023-02-27 - IsaacGifford
Custom Primer DesignOverview | |||||||||||
| Changed: | |||||||||||
| < < | While there are tools available for automatically designing primers (such as the NCBI Primer BLAST) often specialized PCR applications, such as amplifying fragments for cloning or using different polymerases, will necessitate specific primer placements and modifications. In these cases it is important to take extra care to ensure the primers will anneal to the template and amplify well. This page presents guidelines and tools for specifically designing primers from DNA sequences, using the Benchling platform as an example. In short, you will need to: | ||||||||||
| > > | While there are tools available for automatically designing primers (such as the NCBI Primer BLAST) often specialized PCR applications, such as amplifying fragments for Golden Gate or Gibson assembly or using different polymerases, will necessitate specific primer placements and modifications. In these cases it is important to take extra care to ensure the primers will anneal to the template and amplify well. This page presents guidelines and tools for specifically designing primers from DNA sequences, using the Benchling platform as an example. In short, you will need to: | ||||||||||
1) determine where to place your primers within the template sequence to amplify your desired product
2) adjust your primer sequences to ideal annealing temperatures
3) modify the sequences with any necessary adapters and check for inhibitory secondary structures
Designing primers may require trade-offs and revisions to address specific issues that arise during the process. As such it's important to understand the needs of your specific experiment, such as specific locations in the genome, annealing temperatures, and adapter sequences, and keep those in mind while designing your primers.
The examples below illustrate designing primers to amplify the downstream region of the Acinetobacter baylyi ADP1 ACIAD2049 gene for use in Golden Transformation.
1) Determining Primer PlacementI. Start by identifying the region you are amplifying. Some common things to consider are:
Figure 1 Placing a primer downstream of the ACIAD2049 gene. 2) Calculating Annealing TemperaturesCalculate the annealing temperature for your PCR reaction using the NEB Tm Calculator. I. Select the polymerase for your PCR reaction from the drop-down menu. II. Copy ~30 bp of the forward and reverse primer sequences into the Primer 1 and Primer 2 boxes. III. Adjust the annealing temperature (top right box) by removing bases from the 3' end of each primer until:
Figure 2 A) Annealing temperature calculations for ACIAD2049 downstream primers. B) ACIAD2049 downstream forward primer from Figure 1 shortened to account for annealing temperature. 3) Modifying Primer Sequences and Checking Secondary StructuresI. Add any additional modifications or adapters to the end of your sequences. Restriction sequences used for cloning need to be added to the 5' end of the primer sequence. II. Copy and paste each primer sequence into IDT's OligoAnalyzer program. Select "HAIRPIN" to analyze secondary structure formations. Structures with melting temperatures (Tm) below the annealing temperature for your reaction will melt in the thermocycler and not interfere with your reaction (Figure 3, left). Note any structures with Tms within a few degrees of your annealing temperature (Figure 3, right). III. If problematic structures were detected, modify the primer sequence to remove them. Potential solutions include:
Figure 3 OligoAnalyzer results showing primers without (left) and with (right) problematic secondary structures. The structures on the left would all melt in a typical PCR reaction, the first one on the right would form in a reaction with a 57°C annealing temperature. Further Reading
| |||||||||||
| Changed: | |||||||||||
| < < |
| ||||||||||
| > > |
| ||||||||||
| |||||||||||
| Added: | |||||||||||
| > > |
| ||||||||||
Revision 72023-02-27 - IsaacGifford
Custom Primer Design | |||||||||||||||||||
| Added: | |||||||||||||||||||
| > > | Overview | ||||||||||||||||||
| While there are tools available for automatically designing primers (such as the NCBI Primer BLAST) often specialized PCR applications, such as amplifying fragments for cloning or using different polymerases, will necessitate specific primer placements and modifications. In these cases it is important to take extra care to ensure the primers will anneal to the template and amplify well. This page presents guidelines and tools for specifically designing primers from DNA sequences, using the Benchling platform as an example. In short, you will need to: | |||||||||||||||||||
| Changed: | |||||||||||||||||||
| < < | 1) determine where to place your primers within the template sequence to amplify your desired product 2) adjust your primer sequences to ideal annealing temperatures 3) modify the sequences with any necessary adapters and check for inhibitory secondary structures. | ||||||||||||||||||
| > > | 1) determine where to place your primers within the template sequence to amplify your desired product 2) adjust your primer sequences to ideal annealing temperatures 3) modify the sequences with any necessary adapters and check for inhibitory secondary structures | ||||||||||||||||||
| Changed: | |||||||||||||||||||
| < < | Designing primers may require trade-offs and revisions. As such it's important to understand the needs of your specific experiment, such as specific locations in the genome, annealing temperatures, and adapter sequences, and keep those in mind while designing your primers. | ||||||||||||||||||
| > > | Designing primers may require trade-offs and revisions to address specific issues that arise during the process. As such it's important to understand the needs of your specific experiment, such as specific locations in the genome, annealing temperatures, and adapter sequences, and keep those in mind while designing your primers. | ||||||||||||||||||
| The examples below illustrate designing primers to amplify the downstream region of the Acinetobacter baylyi ADP1 ACIAD2049 gene for use in Golden Transformation. | |||||||||||||||||||
| Added: | |||||||||||||||||||
| > > | |||||||||||||||||||
1) Determining Primer Placement | |||||||||||||||||||
| Changed: | |||||||||||||||||||
| < < | I. Start by identifying the gene or region you are amplifying. | ||||||||||||||||||
| > > | I. Start by identifying the region you are amplifying. Some common things to consider are: | ||||||||||||||||||
| Added: | |||||||||||||||||||
| > > |
| ||||||||||||||||||
II. Determine the upstream and downstream locations where you primers will have to anneal to amplify your target. Depending up on your application this may require specific locations (for example, immediately next to the stop codon of a gene if designing primers to knock it out or at a particular base pair in a coding region if your goal is to introduce a point mutation) or a general area.
| |||||||||||||||||||
| Changed: | |||||||||||||||||||
| < < | III. Highlight ~30 base pairs of sequence where you want to place your primer. On Benchling, right-click the highlighted region and select "Create primer" to mark it. You will need to select whether it is a forward or reverse primer. The final design will be refined in the following steps. | ||||||||||||||||||
| > > | III. Highlight ~30 base pairs of sequence where you want to place your primer. On Benchling, right-click the highlighted region and select "Create primer" to mark it. You will need to select whether it is a forward or reverse primer (remember you will need one of each, pointed in opposite directions, for a successful PCR). The final design will be refined in the following steps. | ||||||||||||||||||
|
Figure 1 Placing a primer downstream of the ACIAD2049 gene. | |||||||||||||||||||
| Added: | |||||||||||||||||||
| > > | |||||||||||||||||||
2) Calculating Annealing TemperaturesCalculate the annealing temperature for your PCR reaction using the NEB Tm Calculator. | |||||||||||||||||||
| Changed: | |||||||||||||||||||
| < < | I. Select the polymerase for your PCR reaction from the dropdown menu. | ||||||||||||||||||
| > > | I. Select the polymerase for your PCR reaction from the drop-down menu. | ||||||||||||||||||
II. Copy ~30 bp of the forward and reverse primer sequences into the Primer 1 and Primer 2 boxes.
III. Adjust the annealing temperature (top right box) by removing bases from the 3' end of each primer until:
| |||||||||||||||||||
| Changed: | |||||||||||||||||||
| < < |
| ||||||||||||||||||
| > > |
| ||||||||||||||||||
|
Figure 2 A) Annealing temperature calculations for ACIAD2049 downstream primers. B) ACIAD2049 downstream forward primer from Figure 1 shortened to account for annealing temperature. | |||||||||||||||||||
| Added: | |||||||||||||||||||
| > > | |||||||||||||||||||
3) Modifying Primer Sequences and Checking Secondary StructuresI. Add any additional modifications or adapters to the end of your sequences. Restriction sequences used for cloning need to be added to the 5' end of the primer sequence. | |||||||||||||||||||
| Changed: | |||||||||||||||||||
| < < | II. Copy and paste each primer sequence into IDT's OligoAnalyzer program. Press "HAIRPIN" to analyze secondary structure formations. Structures with melting temperatures (Tm) below the annealing temperature for your reaction will melt in the thermocycler and not interfere with your reaction (Figure 3, left). Note any structures with Tms within a few degrees of your annealing temperature (Figure 3, right). | ||||||||||||||||||
| > > | II. Copy and paste each primer sequence into IDT's OligoAnalyzer program. Select "HAIRPIN" to analyze secondary structure formations. Structures with melting temperatures (Tm) below the annealing temperature for your reaction will melt in the thermocycler and not interfere with your reaction (Figure 3, left). Note any structures with Tms within a few degrees of your annealing temperature (Figure 3, right). | ||||||||||||||||||
III. If problematic structures were detected, modify the primer sequence to remove them. Potential solutions include:
Figure 3 OligoAnalyzer results showing primers without (left) and with (right) problematic secondary structures. The structures on the left would all melt in a typical PCR reaction, the first one on the right would form in a reaction with a 57°C annealing temperature. Further Reading
| |||||||||||||||||||
Revision 62023-02-25 - IsaacGifford
Custom Primer DesignWhile there are tools available for automatically designing primers (such as the NCBI Primer BLAST) often specialized PCR applications, such as amplifying fragments for cloning or using different polymerases, will necessitate specific primer placements and modifications. In these cases it is important to take extra care to ensure the primers will anneal to the template and amplify well. This page presents guidelines and tools for specifically designing primers from DNA sequences, using the Benchling platform as an example. In short, you will need to: 1) determine where to place your primers within the template sequence to amplify your desired product 2) adjust your primer sequences to ideal annealing temperatures 3) modify the sequences with any necessary adapters and check for inhibitory secondary structures. Designing primers may require trade-offs and revisions. As such it's important to understand the needs of your specific experiment, such as specific locations in the genome, annealing temperatures, and adapter sequences, and keep those in mind while designing your primers. | |||||||||||||||||||
| Changed: | |||||||||||||||||||
| < < | The examples presented here illustrate designing primers to amplify the downstream region of the Acinetobacter baylyi ADP1 ACIAD2049 gene for use in Golden Transformation. | ||||||||||||||||||
| > > | The examples below illustrate designing primers to amplify the downstream region of the Acinetobacter baylyi ADP1 ACIAD2049 gene for use in Golden Transformation. | ||||||||||||||||||
1) Determining Primer PlacementI. Start by identifying the gene or region you are amplifying. II. Determine the upstream and downstream locations where you primers will have to anneal to amplify your target. Depending up on your application this may require specific locations (for example, immediately next to the stop codon of a gene if designing primers to knock it out or at a particular base pair in a coding region if your goal is to introduce a point mutation) or a general area.
Figure 1 Placing a primer downstream of the ACIAD2049 gene. 2) Calculating Annealing TemperaturesCalculate the annealing temperature for your PCR reaction using the NEB Tm Calculator. I. Select the polymerase for your PCR reaction from the dropdown menu. II. Copy ~30 bp of the forward and reverse primer sequences into the Primer 1 and Primer 2 boxes. III. Adjust the annealing temperature (top right box) by removing bases from the 3' end of each primer until:
Figure 2 A) Annealing temperature calculations for ACIAD2049 downstream primers. B) ACIAD2049 downstream forward primer from Figure 1 shortened to account for annealing temperature. 3) Modifying Primer Sequences and Checking Secondary StructuresI. Add any additional modifications or adapters to the end of your sequences. Restriction sequences used for cloning need to be added to the 5' end of the primer sequence. II. Copy and paste each primer sequence into IDT's OligoAnalyzer program. Press "HAIRPIN" to analyze secondary structure formations. Structures with melting temperatures (Tm) below the annealing temperature for your reaction will melt in the thermocycler and not interfere with your reaction (Figure 3, left). Note any structures with Tms within a few degrees of your annealing temperature (Figure 3, right). III. If problematic structures were detected, modify the primer sequence to remove them. Potential solutions include:
| |||||||||||||||||||
| Changed: | |||||||||||||||||||
| < < | d. If you have changed one or both primer sequences you will need to recalculate your annealing temperature as above and confirm that it is still within the desired range (make sure to remove any adapter sequences before calculating your annealing temperature. Use only the sequence that anneals to the template DNA). Add or remove additional bases if necessary to bring the annealing temperature back to the desired range. | ||||||||||||||||||
| > > | IV. If you have changed one or both primer sequences you will need to recalculate your annealing temperature as above and confirm that it is still within the desired range (make sure to remove any adapter sequences before calculating your annealing temperature. Use only the sequence that anneals to the template DNA). Add or remove additional bases if necessary to bring the annealing temperature back to the desired range. | ||||||||||||||||||
|
Figure 3 OligoAnalyzer results showing primers without (left) and with (right) problematic secondary structures. The structures on the left would all melt in a typical PCR reaction, the first one on the right would form in a reaction with a 57°C annealing temperature. Further Reading
| |||||||||||||||||||
Revision 52023-02-24 - IsaacGifford
Custom Primer DesignWhile there are tools available for automatically designing primers (such as the NCBI Primer BLAST) often specialized PCR applications, such as amplifying fragments for cloning or using different polymerases, will necessitate specific primer placements and modifications. In these cases it is important to take extra care to ensure the primers will anneal to the template and amplify well. This page presents guidelines and tools for specifically designing primers from DNA sequences, using the Benchling platform as an example. In short, you will need to: 1) determine where to place your primers within the template sequence to amplify your desired product 2) adjust your primer sequences to ideal annealing temperatures 3) modify the sequences with any necessary adapters and check for inhibitory secondary structures. Designing primers may require trade-offs and revisions. As such it's important to understand the needs of your specific experiment, such as specific locations in the genome, annealing temperatures, and adapter sequences, and keep those in mind while designing your primers. The examples presented here illustrate designing primers to amplify the downstream region of the Acinetobacter baylyi ADP1 ACIAD2049 gene for use in Golden Transformation.1) Determining Primer PlacementI. Start by identifying the gene or region you are amplifying. II. Determine the upstream and downstream locations where you primers will have to anneal to amplify your target. Depending up on your application this may require specific locations (for example, immediately next to the stop codon of a gene if designing primers to knock it out or at a particular base pair in a coding region if your goal is to introduce a point mutation) or a general area.
Figure 1 Placing a primer downstream of the ACIAD2049 gene. 2) Calculating Annealing TemperaturesCalculate the annealing temperature for your PCR reaction using the NEB Tm Calculator. I. Select the polymerase for your PCR reaction from the dropdown menu. II. Copy ~30 bp of the forward and reverse primer sequences into the Primer 1 and Primer 2 boxes. III. Adjust the annealing temperature (top right box) by removing bases from the 3' end of each primer until:
| |||||||||||||||||
| Changed: | |||||||||||||||||
| < < | Figure 2 Annealing temperature calculations for ACIAD2049 downstream primers. | ||||||||||||||||
| > > | Figure 2 A) Annealing temperature calculations for ACIAD2049 downstream primers. B) ACIAD2049 downstream forward primer from Figure 1 shortened to account for annealing temperature. | ||||||||||||||||
3) Modifying Primer Sequences and Checking Secondary StructuresI. Add any additional modifications or adapters to the end of your sequences. Restriction sequences used for cloning need to be added to the 5' end of the primer sequence. II. Copy and paste each primer sequence into IDT's OligoAnalyzer program. Press "HAIRPIN" to analyze secondary structure formations. Structures with melting temperatures (Tm) below the annealing temperature for your reaction will melt in the thermocycler and not interfere with your reaction (Figure 3, left). Note any structures with Tms within a few degrees of your annealing temperature (Figure 3, right). III. If problematic structures were detected, modify the primer sequence to remove them. Potential solutions include:
Figure 3 OligoAnalyzer results showing primers without (left) and with (right) problematic secondary structures. The structures on the left would all melt in a typical PCR reaction, the first one on the right would form in a reaction with a 57°C annealing temperature. Further Reading
| |||||||||||||||||
| Added: | |||||||||||||||||
| > > |
| ||||||||||||||||
Revision 42023-02-24 - IsaacGifford
| |||||||||||||
| Changed: | |||||||||||||
| < < | Custom Primer Design Using Benchling | ||||||||||||
| > > | Custom Primer Design | ||||||||||||
While there are tools available for automatically designing primers (such as the NCBI Primer BLAST) often specialized PCR applications, such as amplifying fragments for cloning or using different polymerases, will necessitate specific primer placements and modifications. In these cases it is important to take extra care to ensure the primers will anneal to the template and amplify well. This page presents guidelines and tools for specifically designing primers from DNA sequences, using the Benchling platform as an example. In short, you will need to:
1) determine where to place your primers within the template sequence to amplify your desired product
2) adjust your primer sequences to ideal annealing temperatures
3) modify the sequences with any necessary adapters and check for inhibitory secondary structures.
Designing primers may require trade-offs and revisions. As such it's important to understand the needs of your specific experiment, such as specific locations in the genome, annealing temperatures, and adapter sequences, and keep those in mind while designing your primers.
The examples presented here illustrate designing primers to amplify the downstream region of the Acinetobacter baylyi ADP1 ACIAD2049 gene for use in Golden Transformation.
1) Determining Primer PlacementI. Start by identifying the gene or region you are amplifying. II. Determine the upstream and downstream locations where you primers will have to anneal to amplify your target. Depending up on your application this may require specific locations (for example, immediately next to the stop codon of a gene if designing primers to knock it out or at a particular base pair in a coding region if your goal is to introduce a point mutation) or a general area.
Figure 1 Placing a primer downstream of the ACIAD2049 gene. | |||||||||||||
| Changed: | |||||||||||||
| < < |  | ||||||||||||
| > > | | ||||||||||||
Note GC content can be a useful guide for choosing a good primer location, as equal base distributions (i.e. ~50% GC) are less likely to form detrimental secondary structures. However, this may not be a realistic guideline for all primers as different genomes and locations (such as near promoters) can vary considerably in GC content.
2) Calculating Annealing TemperaturesCalculate the annealing temperature for your PCR reaction using the NEB Tm Calculator. I. Select the polymerase for your PCR reaction from the dropdown menu. II. Copy ~30 bp of the forward and reverse primer sequences into the Primer 1 and Primer 2 boxes. III. Adjust the annealing temperature (top right box) by removing bases from the 3' end of each primer until:
Figure 2 Annealing temperature calculations for ACIAD2049 downstream primers. 3) Modifying Primer Sequences and Checking Secondary StructuresI. Add any additional modifications or adapters to the end of your sequences. Restriction sequences used for cloning need to be added to the 5' end of the primer sequence. II. Copy and paste each primer sequence into IDT's OligoAnalyzer program. Press "HAIRPIN" to analyze secondary structure formations. Structures with melting temperatures (Tm) below the annealing temperature for your reaction will melt in the thermocycler and not interfere with your reaction (Figure 3, left). Note any structures with Tms within a few degrees of your annealing temperature (Figure 3, right). III. If problematic structures were detected, modify the primer sequence to remove them. Potential solutions include:
Figure 3 OligoAnalyzer results showing primers without (left) and with (right) problematic secondary structures. The structures on the left would all melt in a typical PCR reaction, the first one on the right would form in a reaction with a 57°C annealing temperature. Further Reading
| |||||||||||||
| Added: | |||||||||||||
| > > |
| ||||||||||||
Revision 32023-02-24 - IsaacGifford
| |||||||||||
| Changed: | |||||||||||
| < < | Custom Primer Design on Benchling | ||||||||||
| > > | Custom Primer Design Using Benchling | ||||||||||
| Changed: | |||||||||||
| < < | While there are tools available for automatically designing primers (such as the NCBI Primer BLAST) often specialized PCR applications, such as amplifying fragments for cloning, will necessitate specific primer placements and modifications. In these cases it is important to take extra care to ensure the primers will anneal to the template and amplify well. This page presents guidelines and tools for specifically designing primers from DNA sequences, using the Benchling platform as an example. In short, you will need to: | ||||||||||
| > > | While there are tools available for automatically designing primers (such as the NCBI Primer BLAST) often specialized PCR applications, such as amplifying fragments for cloning or using different polymerases, will necessitate specific primer placements and modifications. In these cases it is important to take extra care to ensure the primers will anneal to the template and amplify well. This page presents guidelines and tools for specifically designing primers from DNA sequences, using the Benchling platform as an example. In short, you will need to: | ||||||||||
1) determine where to place your primers within the template sequence to amplify your desired product
2) adjust your primer sequences to ideal annealing temperatures
3) modify the sequences with any necessary adapters and check for inhibitory secondary structures.
Designing primers may require trade-offs and revisions. As such it's important to understand the needs of your specific experiment, such as specific locations in the genome, annealing temperatures, and adapter sequences, and keep those in mind while designing your primers.
The examples presented here illustrate designing primers to amplify the downstream region of the Acinetobacter baylyi ADP1 ACIAD2049 gene for use in Golden Transformation.
1) Determining Primer Placement | |||||||||||
| Added: | |||||||||||
| > > | I. Start by identifying the gene or region you are amplifying.
II. Determine the upstream and downstream locations where you primers will have to anneal to amplify your target. Depending up on your application this may require specific locations (for example, immediately next to the stop codon of a gene if designing primers to knock it out or at a particular base pair in a coding region if your goal is to introduce a point mutation) or a general area.
| ||||||||||
| Deleted: | |||||||||||
| < < | |||||||||||
Figure 1 Placing a primer downstream of the ACIAD2049 gene. | |||||||||||
| Added: | |||||||||||
| > > | Note GC content can be a useful guide for choosing a good primer location, as equal base distributions (i.e. ~50% GC) are less likely to form detrimental secondary structures. However, this may not be a realistic guideline for all primers as different genomes and locations (such as near promoters) can vary considerably in GC content. | ||||||||||
2) Calculating Annealing TemperaturesCalculate the annealing temperature for your PCR reaction using the NEB Tm Calculator. | |||||||||||
| Changed: | |||||||||||
| < < | a. Select the polymerase for your PCR reaction from the dropdown menu. b. Copy ~30 bp of the forward and reverse primer sequences into the Primer 1 and Primer 2 boxes. c. Adjust the annealing temperature (top right box) by removing bases from the 3' end of each primer until: | ||||||||||
| > > | I. Select the polymerase for your PCR reaction from the dropdown menu. II. Copy ~30 bp of the forward and reverse primer sequences into the Primer 1 and Primer 2 boxes. III. Adjust the annealing temperature (top right box) by removing bases from the 3' end of each primer until: | ||||||||||
Figure 2 Annealing temperature calculations for ACIAD2049 downstream primers. 3) Modifying Primer Sequences and Checking Secondary Structures | |||||||||||
| Changed: | |||||||||||
| < < | a. Add any additional modifications or adapters to the end of your sequences. Restriction sequences used for cloning need to be added to the 5' end of the primer sequence. b. Copy and paste each primer sequence into IDT's OligoAnalyzer program. Press "HAIRPIN" to analyze secondary structure formations. Structures with melting temperatures (Tm) below the annealing temperature for your reaction will melt in the thermocycler and not interfere with your reaction (see Figure 3 for example). Note any structures with Tms within a few degrees of your annealing temperature (see Figure 4 for example). c. If problematic structures were detected, modify the primer sequence to remove them. Potential solutions include: | ||||||||||
| > > | I. Add any additional modifications or adapters to the end of your sequences. Restriction sequences used for cloning need to be added to the 5' end of the primer sequence. II. Copy and paste each primer sequence into IDT's OligoAnalyzer program. Press "HAIRPIN" to analyze secondary structure formations. Structures with melting temperatures (Tm) below the annealing temperature for your reaction will melt in the thermocycler and not interfere with your reaction (Figure 3, left). Note any structures with Tms within a few degrees of your annealing temperature (Figure 3, right). III. If problematic structures were detected, modify the primer sequence to remove them. Potential solutions include: | ||||||||||
| |||||||||||
| Changed: | |||||||||||
| < < | Figure 3 OligoAnalyzer results without problematic secondary structures. | ||||||||||
| > > | Figure 3 OligoAnalyzer results showing primers without (left) and with (right) problematic secondary structures. The structures on the left would all melt in a typical PCR reaction, the first one on the right would form in a reaction with a 57°C annealing temperature. | ||||||||||
| Deleted: | |||||||||||
| < < | Figure 4 OligoAnalyzer results predicting problematic secondary structures. | ||||||||||
Further Reading
| |||||||||||
| Added: | |||||||||||
| > > |
| ||||||||||

Revision 22023-02-23 - IsaacGifford
| |||||||||||
| Changed: | |||||||||||
| < < | Designing Specific Primers on Benchling | ||||||||||
| > > | Custom Primer Design on Benchling | ||||||||||
| Changed: | |||||||||||
| < < | While there are tools available for automatically designing primers (such as the NCBI Primer BLAST) often specific PCR applications, such as amplifying fragments for cloning, will necessitate specific primer placements and modifications. This page presents guidelines and tools for specifically designing primers from DNA sequences, using the Benchling platform as an example. In short, you will need to: | ||||||||||
| > > | While there are tools available for automatically designing primers (such as the NCBI Primer BLAST) often specialized PCR applications, such as amplifying fragments for cloning, will necessitate specific primer placements and modifications. In these cases it is important to take extra care to ensure the primers will anneal to the template and amplify well. This page presents guidelines and tools for specifically designing primers from DNA sequences, using the Benchling platform as an example. In short, you will need to: | ||||||||||
| 1) determine where to place your primers within the template sequence to amplify your desired product 2) adjust your primer sequences to ideal annealing temperatures 3) modify the sequences with any necessary adapters and check for inhibitory secondary structures. | |||||||||||
| Added: | |||||||||||
| > > | Designing primers may require trade-offs and revisions. As such it's important to understand the needs of your specific experiment, such as specific locations in the genome, annealing temperatures, and adapter sequences, and keep those in mind while designing your primers. The examples presented here illustrate designing primers to amplify the downstream region of the Acinetobacter baylyi ADP1 ACIAD2049 gene for use in Golden Transformation. | ||||||||||
1) Determining Primer Placement | |||||||||||
| Added: | |||||||||||
| > > | Figure 1 Placing a primer downstream of the ACIAD2049 gene. | ||||||||||
2) Calculating Annealing TemperaturesCalculate the annealing temperature for your PCR reaction using the NEB Tm Calculator. a. Select the polymerase for your PCR reaction from the dropdown menu. b. Copy ~30 bp of the forward and reverse primer sequences into the Primer 1 and Primer 2 boxes. c. Adjust the annealing temperature (top right box) by removing bases from the 3' end of each primer until:
| |||||||||||
| Changed: | |||||||||||
| < < |
| ||||||||||
| > > |
| ||||||||||
| |||||||||||
| Added: | |||||||||||
| > > |
| ||||||||||
| Added: | |||||||||||
| > > | Figure 2 Annealing temperature calculations for ACIAD2049 downstream primers. | ||||||||||
3) Modifying Primer Sequences and Checking Secondary Structures | |||||||||||
| Changed: | |||||||||||
| < < | https://www.idtdna.com/calc/analyzer | ||||||||||
| > > | a. Add any additional modifications or adapters to the end of your sequences. Restriction sequences used for cloning need to be added to the 5' end of the primer sequence. | ||||||||||
| Added: | |||||||||||
| > > | b. Copy and paste each primer sequence into IDT's OligoAnalyzer program. Press "HAIRPIN" to analyze secondary structure formations. Structures with melting temperatures (Tm) below the annealing temperature for your reaction will melt in the thermocycler and not interfere with your reaction (see Figure 3 for example). Note any structures with Tms within a few degrees of your annealing temperature (see Figure 4 for example).
c. If problematic structures were detected, modify the primer sequence to remove them. Potential solutions include:
| ||||||||||
| Added: | |||||||||||
| > > | Figure 3 OligoAnalyzer results without problematic secondary structures. Figure 4 OligoAnalyzer results predicting problematic secondary structures. | ||||||||||
Further Reading | |||||||||||
| Added: | |||||||||||
| > > |
| ||||||||||
Revision 12023-02-22 - IsaacGifford
Designing Specific Primers on BenchlingWhile there are tools available for automatically designing primers (such as the NCBI Primer BLAST) often specific PCR applications, such as amplifying fragments for cloning, will necessitate specific primer placements and modifications. This page presents guidelines and tools for specifically designing primers from DNA sequences, using the Benchling platform as an example. In short, you will need to: 1) determine where to place your primers within the template sequence to amplify your desired product 2) adjust your primer sequences to ideal annealing temperatures 3) modify the sequences with any necessary adapters and check for inhibitory secondary structures.1) Determining Primer Placement2) Calculating Annealing TemperaturesCalculate the annealing temperature for your PCR reaction using the NEB Tm Calculator. a. Select the polymerase for your PCR reaction from the dropdown menu. b. Copy ~30 bp of the forward and reverse primer sequences into the Primer 1 and Primer 2 boxes. c. Adjust the annealing temperature (top right box) by removing bases from the 3' end of each primer until:
3) Modifying Primer Sequences and Checking Secondary Structureshttps://www.idtdna.com/calc/analyzerFurther Reading |